The Birkin

The Birkin
The finished article

Sunday, September 2, 2007

You know, I think it may be a car

There's been some movement lately, which has made the car look, well, more car-like. The front and rear suspension and running gear is coming together, with the uprights installed at both ends. When you attach the steering rack to the front and turn the shaft, there's a satifying corresponding movement in the uprights to turn left and right. OK, I know, juvenile, but it's great to see some mechanical movement at last.


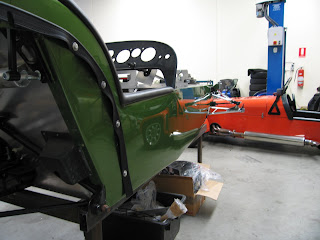
I've also been putting the dash in - the dials and lights are all provided, and the holes all pre-drilled. The dash only required some work on the holes for the lights to make them large enough, which wasn't that hard, plus I need to drill an additional hole for one more. ADR requires, of all things, a seatbelt light to warn me if someone's seatbelt isn't done up. I have absolutely no idea who would be in a Birkin and not realise they had no seatbelt (especially after they've left an impression of the dashboard in their forehead at the first lights), but there's a light just in case. I'm also not sure how that wires into the racing harness or not.

I've also been looking at making my first, individual, decision (so far I've copied everyone else). I thinking of moving the ignition from the usual position, where it's attached to the steering column. In the Caterham, I kept bashing my knee on it, plus you have to contort a little to reach the damn thing. Then the keys keep hitting things. I've been wondering whether it's possible to move the ignition down to the centre console. Keeps it all out of the way. Hey, maybe I could even have a pushbutton start ;-)




Monday, July 23, 2007

More progress, but a bit stop-start

More progress this weekend - still a little bit hidden, but the next series of steps should start to make a difference to how the car looks.

First up was to install the rear wishbones, both upper and lower. Pretty straight forward at this stage, as they just slot in with the bolts loosely fastened. The trick comes in a little while when I attempt to get about 20 different moving parts to all mesh into a single integrated unit.

Progress stopped on the rear suspension when I realised that the uprights are all still at Dad's - I've got them back in Perth now, so they can go on next week. That will make the car start to look a little more complete, as the uprights have things like brake calipers and disks etc, and you can mount wheels on. It also means that I can test the handbrake operation, then once that's done get the diff and half-shafts in.

I can also install the front uprights and therefore the shocks and springs, which should make the front a little more car-like as well.

I also started threading the wiring loom in. One thing about the new Birkins - the fuse box is now really, really small, as the engine now cuts into the space where it used to be. It also reduces the passenger footwell quite a bit. From the wiring perspective, I'd be interested in seeing how others have managed to get the fuses and so on mounted in there. One option is to simply let them float around (it's pretty tight) rather than try anad screw them to anything. They won't move around that much.

I also spent an inordinate amount of time fabracating a small bracket to keep the wiring nice and neat. Took a while, but its the first time I've actually made something for the car rather than just bolting things on.

So, more progress. Next week I'll be taking some days off, and working on the car either side of a Sydney trip.

Monday, July 16, 2007

If I had suspension, wheels and brakes installed, I could park

Three cables. One triangle thingy. Four hours.

This could take a while.

I've installed the handbrake - well, the handbrake itself (two bolts), the three cables, and the triangle that turns to activate the rear brakes when the handbrake is pulled. So far the cables go out into space, as now I have to install the rear suspension arms and uprights which include the calipers to attach this all to. At the moment, all I can achieve is to pull the handbrake, get the clicking noise and make two cables get shorter. Hold back the excitement.....

In my defense, it wasn't as simple as it first looked. I did have to get the dremel out and make a few holes a little bigger to allow the cable to thread properly through the chassis. And there was some scratching of heads trying to figure out how the pictures related to reality, plus a few missing pieces (nothing major, custom or tricky, just some split pins) to replace.

At the very least, it means I can now get the rear end moving - I can install the diff, the half-shafts, the rear suspension etc etc. It's all a progression that needed the handbrake installed, so it releases a whole series of activities that I can get on with. In project manager speak, the handbrake was a critical path item.

I'm planning on taking a few weeks off shortly to actually focus on the build, which should mean some better progress than I'm showing now. I must admit, the lack of time is starting to annoy me.

Monday, June 4, 2007

Baby Steps

Spent a day on the weekend with Dad continuing on the car, which was great. The first task we tried was to install the handbrake – except I have the handbrake cable for a Live Axle car rather that the cables needed for the IRS. So that stopped that, and I need to get this in and the rear brake cables before the diff goes in, which has to happen before the rear suspension goes in. So the back-end of the car is on hold for now.

However, as with most things, there are other activities that can happen in the meantime. We moved to fitting the drivers seat. Because of the range of relative sizes of the two main drivers (Dad and I), we needed to put the adjustable runners into the car. In most vehicles that wouldn’t matter, it’s just that in this sort of car it’s all or nothing – if I can reach the pedals, Dad can’t. If Dad can reach the pedals, I can’t get my knees under the dash. So the movable seat is required.

The downside apparently is around the stability of the seat. As the runners are mobile, and the anchor points are brought inside the main runners, the stability suffers, by all account. Whilst the seat isn’t structural – it doesn’t hold you in, the belt does – it is important to feel secure, and to have all the messages from the chassis translated through the seat to your backside properly.


So there were a couple of things to do. Bolt the runners in – no problem. Cut a hole in the bottom of the seat to allow space for the runner – slight problem. The measurements in the book would have put a huge hole in completely the wrong place. And now this is where Dad comes into his own – measuring and measuring and measuring against to get it right, even if it doesn’t matter as you can’t see the holes. Did it all, and it turns out to be a really nice, neat job.


Dad also came up with a good idea to resolve the stability issue. We’re going to craft a simple metal frame that goes between the bottom of the seat and the squab. This will anchor the seat tightly to the frame, and spread the load a little wider than the underlying frame. Simple and cheap – gotta be a first for this build.


We also bolted the wiper motor on. No real excitement there.


So for a day’s effort, we put a seat in. This could take a while, especially as my work now takes me to Melbourne basically full-time until the middle of July, at which point I might take a few weeks off to focus on the car. Then the blog updates will come fast and furious, I promise.

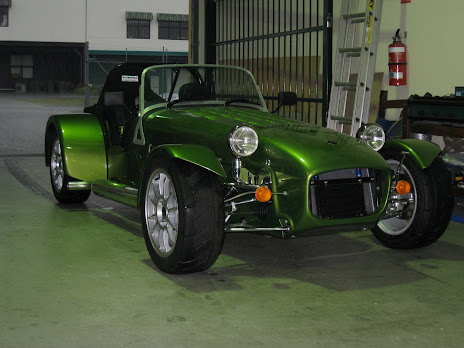
You’ll also notice some photos of the car in this posting – what do ya’ll think of the colour?


Monday, May 21, 2007

Gee, it's very err, green, isn't it?

Finally got to see the car, and yes, it's extremely green at this stage. Overly green, in fact. But I guess you could expect that, as there's nothing else on the body and nothing breaking up the colour. However, there's a really nice movement of the light in the paint, it keeps changing colour depending on where you stand and how the light falls - not quite Harlequin paint, but close. I must admit seeing it for the first time, it wasn't exactly love at first sight, but it's growing on me.

So ignoring a series of barbed comments and outright insults, I finally got to start putting things on the car.

And the change was immediate - as soon as you start breaking the lines with simple things like the rubber strips for the rear arches, and the beading for the suspension holes, it starts to break up the block colours and give the car a little more definition, which was lucky.

So, to the first task - could have a done a few things like the differential, wiring loom or front suspension, but I wanted to see what the front end looked like with all the chrome, so tackled that first. And learnt a few lessons:
  1. Don't bolt everything up tight until near the end, otherwise things won't fit. It's a kit car, not a piece of absolute precision engineering, so things need to wiggle a bit sometimes to fit
  2. Actually stop and think occaisionally
  3. Use other cars (and other people) to check what you've done
  4. Don't be afraid to hit it with a hammer (still working on this one)
  5. Turn the nut, not the bolt.

I put the steering rack in, torqued it all up to the recommended 28Nm, looked at my handiwork then realised that I needed to undo it all to put in the other bits that sit under the bolt heads. Then threaded a screw taking it all off again. Fine, probably about 1.5 hours wasted there, but the steering rack is in, and lesson 1, 2 and 3 learnt.

Then, putting the front wishbones on required a bit more force (lesson 4). Then I discovered I'd put one of the upper wishbones on back to front (re-learn lesson 2 and 3).

All up, 8 hours of work netted the rubber strips back on the car, steering rack and associated equipment bolted in, and upper and lower wishbones installed. And let me tell you, with the chroming and everything, it looks bloody good. Even got a few comments that already it looked a lot better now than it did in the morning.

We also tied the lower wishbones to the upper to keep them from hanging off the car, and we used bright red wire which also looks damn good against the green (the colour, not the wire). I think I might look to add some subtle red somewhere in the build as a contrasting colour - perhaps paint the uprights red? Not sure, want it to be subtle (as it's an extremely strong contrast) but there.

Pretty damn happy now that it's all started, I just hope I get better at it because if I keep building it the way I did on Saturday it'll take 12 months and will fall apart. Hopefully I'll actually figure out how to use the tools at some point ;-)

Oh yes, and photos. Turns out my camera phone photos look terrible, and I'm away now for two weeks, so you'll have to hang on a little longer. I'm thinking of buying a new camera anyway.

Tuesday, May 15, 2007

It's back!

Unfortunately, I'm not. I'm still in Melbourne, doing my weekly 7000km round trip to work on the car on Saturday.

Frank has the car back in the workshop - his comment is that no-one that has seen it so far likes it. I haven't seen it, but I'm prepared to give it the benefit of the doubt ;-) I think it probably looks extremely green at the moment, as it's just a painted shell. Once I get the interior, seats, suspension etc onto it, it will break the colour up a little more.

Personally, I can't wait to see it, and finally get some a) photo's and b) actual visible progress made on the car.

In honour of the completion of the paint job, you'll note that I've changed the colour scheme on the blog. Looking at it, I'm not sure whether I like it, but we'll see if it grows on me.

Tuesday, May 8, 2007

1000+ views!

So, I note today that my little page impression counter has topped 1000 - OK, probably 100 of those are mine, however that's still quite a few people.....thanks to everyone who's reading this, hope it's of interest, and please feel free to leave comments, even if it is to tell me I'm soft in the head for painting my car green......