So ignoring a series of barbed comments and outright insults, I finally got to start putting things on the car.
And the change was immediate - as soon as you start breaking the lines with simple things like the rubber strips for the rear arches, and the beading for the suspension holes, it starts to break up the block colours and give the car a little more definition, which was lucky.
So, to the first task - could have a done a few things like the differential, wiring loom or front suspension, but I wanted to see what the front end looked like with all the chrome, so tackled that first. And learnt a few lessons:
- Don't bolt everything up tight until near the end, otherwise things won't fit. It's a kit car, not a piece of absolute precision engineering, so things need to wiggle a bit sometimes to fit
- Actually stop and think occaisionally
- Use other cars (and other people) to check what you've done
- Don't be afraid to hit it with a hammer (still working on this one)
- Turn the nut, not the bolt.
I put the steering rack in, torqued it all up to the recommended 28Nm, looked at my handiwork then realised that I needed to undo it all to put in the other bits that sit under the bolt heads. Then threaded a screw taking it all off again. Fine, probably about 1.5 hours wasted there, but the steering rack is in, and lesson 1, 2 and 3 learnt.
Then, putting the front wishbones on required a bit more force (lesson 4). Then I discovered I'd put one of the upper wishbones on back to front (re-learn lesson 2 and 3).
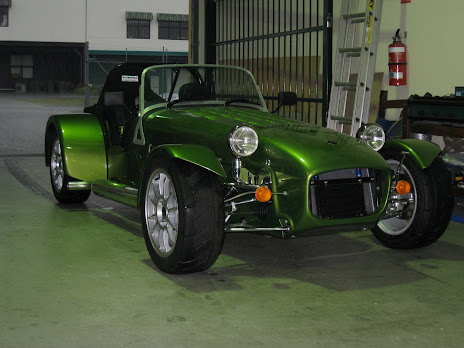
All up, 8 hours of work netted the rubber strips back on the car, steering rack and associated equipment bolted in, and upper and lower wishbones installed. And let me tell you, with the chroming and everything, it looks bloody good. Even got a few comments that already it looked a lot better now than it did in the morning.
We also tied the lower wishbones to the upper to keep them from hanging off the car, and we used bright red wire which also looks damn good against the green (the colour, not the wire). I think I might look to add some subtle red somewhere in the build as a contrasting colour - perhaps paint the uprights red? Not sure, want it to be subtle (as it's an extremely strong contrast) but there.
Pretty damn happy now that it's all started, I just hope I get better at it because if I keep building it the way I did on Saturday it'll take 12 months and will fall apart. Hopefully I'll actually figure out how to use the tools at some point ;-)
Oh yes, and photos. Turns out my camera phone photos look terrible, and I'm away now for two weeks, so you'll have to hang on a little longer. I'm thinking of buying a new camera anyway.
 people.
2 comments:
I dropped into the workshop and saw your green beast, however, there were no guards. Frank told me they were at the painters and were turning black! To which I said that'll look good!
Still think it needs a yellow stripe! (he he he)
*looks at old photo of his car when it was COnrad's*
Eek... no idea what Conrad was thinikng with those rear lights LOL!
Hope yopur build is going okay - where's the pics???? :D
Rick
Post a Comment