When too much power just isn't enough.....Frank has come up with a new option for the throttle bodies. There's a local (i.e. Melbourne) guy who casts his own throttle bodies, and is developing a straight through tapered throttle body for the Duratec.
So, now for a discussion on what this all means....
The throttle bodies replace the car's existing air intake (induction) system. Normal cars have a huge air filter with a single pipe feeding all of the cylinders at once. Throttle bodies provide independent air feeds for each cylinder, and incorporate a butterfly valve in each to control the amount of air that reaches each cylinder. Throttle bodies provide a cleaner airflow, and ensure that each cylinder receives the same amount of air.
Tapered throttle bodies start out wide, and end up narrow - as you can imagine, this means that the air arrives in the cylinder at a higher velocity / density - which is what turbo and superchargers are there for, to provide denser air. Now this is nowhere near a forced induction system, but it has the same effect of increasing power.
Most air intakes have kinks and bends in them, which introduces turbulence and disturbances to the airflow. The ideal is to have the air go straight into the cylinder head with the minimum of fuss, hence a straight-through throttle body is desirable. To be honest, the ones I have now are straight through as well....
The other thing about the new throttle bodies is that I can add another set of injectors later if I want to (would require a new computer) so that there would be eight injectors all up. Wrecks the fuel consumption but adds a heck of a lot of power, apparently ;-)
The only change to the outside of the car is that the hole for the throttle bodies will be higher up the bonnet, which as I haven't cut the hole yet, isn't a problem.
Apart from that, the engine is still in bits, so no other news there, I'm afraid.
The Birkin
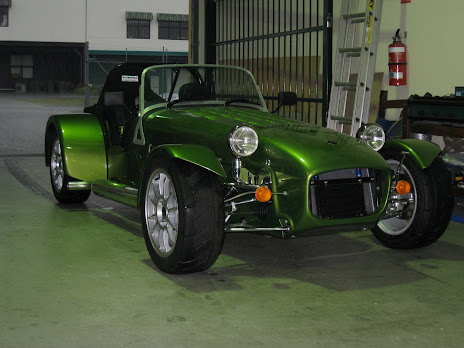
The finished article
Tuesday, January 29, 2008


Saturday, January 26, 2008
So much time, so little progress!
Well, OK, that's not entirely true. Quite a bit of progress has been made, actually, which given that building the car is now a full-time occupation, is only to be expected.....
Yup, I've taken a few months out to work on the car, sort out the house, get fit again, and do all the sorts of things that normally happen in between work, rather than what I've been doing which is just working.
So what have I achieved - I'll list them out:
Yup, I've taken a few months out to work on the car, sort out the house, get fit again, and do all the sorts of things that normally happen in between work, rather than what I've been doing which is just working.
So what have I achieved - I'll list them out:
- All non-suspension related bolts torqued to final settings
- Rear guards fitted, indicators / brake lights fitted
- Number plate position and light installed
- Fuel lines installed, along with fuel filter
- Reversing light installed (although this will be moved later)
- Centre console redone (didn't like the standard one)
- Wiper blade arm installed
- Headlights pre-fitted
- Front guards fitted (still some work to do there)
The major changes are to the back end of the car, where all of the lighting is now installed, and it all looks pretty good. The real test comes when I can stand 50 feet away, where all of the angles will be more obvious - I have not doubt I'll be straightening a few bits and pieces here and there, but it will only be a matter of milimeters.
I've also ordered the plates - the car will be called "Mosquito", which somewhat changes the original theme I was going for. However, I think it's a good moniker - a mosquito is small, fast moving, agile, and has makes a noise you can't ignore. The Birkin will be small, fast moving, agile, and will make a noise you can't ignore from three suburbs away.
Anyway, I have some photos to add (at my parents once more on 128K), so will add these shortly, along with some more commentary on the work done to date.
Monday, December 31, 2007
It's on wheels!!!
Yes, it's now on it's wheels. After a big push towards getting a lot of work done, Dad and I got the brakes bled, the diff and half-shafts installed, and the front suspension sorted out. This means that after a weeks work, the car car be pushed around!
First, the breakes. We bled all the brakes, so now there's pressure in the system and the brakes all work. I did stuff one up, and threaded one of my front calipers, which was a problem. Frank helicoiled the caliper and all was well, but as a mental not I'll watch that one for any leakage for the first few hundred km's.
With a few minor leaks sorted out, this was over pretty quickly, especially as a tag team. Bleeding brakes is a two person job.
Getting the diff in was fun, although luckily with the small and light Subaru diff, this could be done with all of the backplate in place, whereas the Sierra diff requires the backend to be largely dismantled to get it in. So we manouevered it into place, bolted it up, and it was ready for the halfshafts.
These went in without a hitch, although it's sobering to realise that the entire power transfer from the diff to each halfshaft is controlled by six small bolts on each shaft. Still the diff holds the prop shaft with four bolts, so I guess it's all OK. Someone must have done the maths somewhere.
Anyway, with that all done, all it took was bolting the wheels on, and getting a crane out to lift the car off it's frame and onto the floor, where it sits today. Again, lots of photos, but I'll upload these later.
I did have to come in the day after and tighten up some bolts on the rear uprights, as in the excitement we had completely forgotten to do any of these up beyond a few threads. So I took each wheel off and put these on properly (but not to final tightness). So I could take the Christmas / New Years break without worrying that the backend would fall off.
First, the breakes. We bled all the brakes, so now there's pressure in the system and the brakes all work. I did stuff one up, and threaded one of my front calipers, which was a problem. Frank helicoiled the caliper and all was well, but as a mental not I'll watch that one for any leakage for the first few hundred km's.
With a few minor leaks sorted out, this was over pretty quickly, especially as a tag team. Bleeding brakes is a two person job.
Getting the diff in was fun, although luckily with the small and light Subaru diff, this could be done with all of the backplate in place, whereas the Sierra diff requires the backend to be largely dismantled to get it in. So we manouevered it into place, bolted it up, and it was ready for the halfshafts.
These went in without a hitch, although it's sobering to realise that the entire power transfer from the diff to each halfshaft is controlled by six small bolts on each shaft. Still the diff holds the prop shaft with four bolts, so I guess it's all OK. Someone must have done the maths somewhere.
Anyway, with that all done, all it took was bolting the wheels on, and getting a crane out to lift the car off it's frame and onto the floor, where it sits today. Again, lots of photos, but I'll upload these later.
I did have to come in the day after and tighten up some bolts on the rear uprights, as in the excitement we had completely forgotten to do any of these up beyond a few threads. So I took each wheel off and put these on properly (but not to final tightness). So I could take the Christmas / New Years break without worrying that the backend would fall off.
Wednesday, December 12, 2007
Stress is drilling 26 holes into your immaculate paintwork
So, I've finally managed to do what I've been threatening all along, and taken a long holiday to work on the car. So there had better be some progress to show for it.
Apart from a few invisible things (like wiring up the car horns), the major activity over the past three days has been in getting the boot cover and tonneau on. This involves drilling a large number of holes in the body of the car, with all the exciting possibilities of skipping a drillbit across the nicely painted surface. It's the sort of thing you want to psyche yourself up for, really.
The first thing to do is to mark out where you're going to drill. The way I approached this was to put masking tape around the top of the boot area, then measure out where all the holes go. Then measure again. Then step back and take a look by eye, do some more measuring, move a few holes, and measure again. You only get one shot with the drill, after all.
There are some decisions to be made - stick with the book measurements, or go for your own? Black or silver poppers? I decided to mainly stick with the book, which has quite a few poppers around the edges, including some on the corners, as it reduced the likelyhood of any odd pulls where I might make a mistake. I also went for the black poppers - what the hell, they can be changed later.
So, out with the drill, and 26 holes later, all was well. Then it was just a case of riveting in the base of the poppers to the skin, remembering to use a small washer behind each rivet. There's also a risk of skipping here - as the rivet breaks in the gun, it might jump out of the base and hit the skin - only did this once and it's barely noticeable. Did stop for a cup of tea after that one, however ;-)
Then you glue the boot cover to the back of the car, using the same glue as in the carpets. Wasn't enough to muck about with my head this time, luckily. You then need to get the cover over the back and line up the other part of the popper - again, check and check again. Start with the corners, then the outer points, then do the middle points. After a few demos from Frank, it was all done in a little over a day. Which is pretty slow, but I took my time and I reckon I did a good job of it. After wetting it down to allow it to shrink a little, it's as tight as a drum.
The next bit is the toneau, which covers the cockpit. You can either have the whole thing covered (which keeps the rain out), or just the passenger section. Same process as before. One point to note is that the car comes with the popper bases already in the padding over the scuttle - you need to replace these, as the lip on the base is too short, so the tops can't gain enough purchase on the base to hold the tonneau in place. This, plus the fact that the bases sit deep into the padding means the tonneau kept falling off until I fixed this.
All in all a good job, I reckon.
The most astonishing thing about finishing this was Frank saying "oh well, its ready to go onto its wheels now", which I thought was a way off, but apparently not ;-)
Oh, and there are lots of photo's (new camera and everything), but I'm at my parents place in the country, and Telstra believes that 128K is a perfectly acceptable speed for "broadband"....so they'll be up once I get somewhere civilised.
Apart from a few invisible things (like wiring up the car horns), the major activity over the past three days has been in getting the boot cover and tonneau on. This involves drilling a large number of holes in the body of the car, with all the exciting possibilities of skipping a drillbit across the nicely painted surface. It's the sort of thing you want to psyche yourself up for, really.
The first thing to do is to mark out where you're going to drill. The way I approached this was to put masking tape around the top of the boot area, then measure out where all the holes go. Then measure again. Then step back and take a look by eye, do some more measuring, move a few holes, and measure again. You only get one shot with the drill, after all.
There are some decisions to be made - stick with the book measurements, or go for your own? Black or silver poppers? I decided to mainly stick with the book, which has quite a few poppers around the edges, including some on the corners, as it reduced the likelyhood of any odd pulls where I might make a mistake. I also went for the black poppers - what the hell, they can be changed later.
So, out with the drill, and 26 holes later, all was well. Then it was just a case of riveting in the base of the poppers to the skin, remembering to use a small washer behind each rivet. There's also a risk of skipping here - as the rivet breaks in the gun, it might jump out of the base and hit the skin - only did this once and it's barely noticeable. Did stop for a cup of tea after that one, however ;-)
Then you glue the boot cover to the back of the car, using the same glue as in the carpets. Wasn't enough to muck about with my head this time, luckily. You then need to get the cover over the back and line up the other part of the popper - again, check and check again. Start with the corners, then the outer points, then do the middle points. After a few demos from Frank, it was all done in a little over a day. Which is pretty slow, but I took my time and I reckon I did a good job of it. After wetting it down to allow it to shrink a little, it's as tight as a drum.
The next bit is the toneau, which covers the cockpit. You can either have the whole thing covered (which keeps the rain out), or just the passenger section. Same process as before. One point to note is that the car comes with the popper bases already in the padding over the scuttle - you need to replace these, as the lip on the base is too short, so the tops can't gain enough purchase on the base to hold the tonneau in place. This, plus the fact that the bases sit deep into the padding means the tonneau kept falling off until I fixed this.
All in all a good job, I reckon.
The most astonishing thing about finishing this was Frank saying "oh well, its ready to go onto its wheels now", which I thought was a way off, but apparently not ;-)
Oh, and there are lots of photo's (new camera and everything), but I'm at my parents place in the country, and Telstra believes that 128K is a perfectly acceptable speed for "broadband"....so they'll be up once I get somewhere civilised.
Wednesday, December 5, 2007
Lessons Learnt

/Constable Care Mode On/
Something I've learnt is that there's always something new to learn. So you may read this and go 'idiot, who doesn't know that?', or perhaps even than I'm wrong. Or you may read this and say, 'I never thought of it that way before'. I guess this is aimed at people new to owning and driving a clubman, rather than race-hardened track pros. Particularly as its not anything to do with racing.
So here goes, driving advice from a guy with a car still in pieces.
When I bought my Caterham in the UK, one of the things that got me a discount off my insurance was to take a driving lesson with Cadence (http://www.cadence.co.uk/). These guys are professional driving instructors, but not your usual guy in beige trousers with a clipboad and a dual control Mitsubishi Colt. These guys teach proper and safe driving technique to drive 'progressively', as they call it. And it was probably one of the best things I did. It wasn't focussed on driving fast, it was focussed on driving safe. Driving a Caterham (or a Birkin, Westfield, Fraser, Robin Hood etc) is a different experience, both for the driver and other road users. And while you can't do much about other people being idiots, you can at least anticipate.
Note that there are a lot of parallels in driving a Birkin with riding a motorbike - keeping aware of where you are on the road, and particularly where you are in relation to other drivers. Also constantly asking - did he/she see me? And never, ever assuming they did. Because the 1 time in 100 that they didn't, the consequences in a Birkin are much more serious. Looking around, there are actually a lot of ex-bikers in clubmans, which probably helps keep the acccident rate down ;-)
Anyway, I went out a did this driving lesson in my new Caterham. They guy jumps in, tests a few things out (like the brakes), and off we go.
He then proceeds to demonstrate how to drive progressively. This is much the same as bikers do - moving quickly, but smoothly amongst traffic. The key point is to control what goes on around you, and not let others control you. In other words, you make sure you do not place yourself into dangerous positions, and most importantly, you don't let others do it to you. If you're just happily trundling along and someone puts you in their blind spot, get out of it!
Cornering
This is not a section on how to take a racing line - lots of other places for that, and people get upset when you take a late apex on Albany Highway. This is more about how to drive on a nice country road.
First, look through the corner, not at the corner. If you focus on just your apex, you'll hit the apex to within a centimeter, then hit the cow three feet further on. So constantly look through the corner to the exit, and flow through the apex, rather than drive at it.
Second, position yourself for the corner. On a left hander, move towards the middle of the road - the Birkin is a narrow car, so this gives you quite a bit of room to play with. Don't cross the line, but get into position. Brake progressively (don't stamp, but don't tickle the pedal) and change up to the right gear. Now, look through the corner and hit your apex, and progressively apply the loud pedal. On a right hander, do the opposite (but watch out for rough edges).
Oh, and if you think trail braking is a good idea on a public road, please let me know when you're out and about so I can avoid you.
The emphasis is on smooth rather than fast. This transfers weight from neutral to the front wheels under braking for more turn-in grip, then to the outside wheels for the turn itself. Keeping everything smooth means you have less chance of surprising yourself or others by rapid and unplanned changes of direction. It also gives you more options if something unexpected comes up.
Overtaking
Overtaking for a car such as a Birkin is pretty much an everyday occurrence, especially on open roads. Overtaking is of course a relatively dangerous manoeuvre when compared with just tootling along, but the risks in a Birkin are different to those in a normal car. Whilst we have more power (and therefore require less time to overtake), the nature of the Birkin means some additional techniques are required for safe overtaking.
Some things to consider:
Setting up an Overtake
We cannot see around other cars as easily. The usual approach to overtaking in a tank is to come up relatively close (but still a safe distance, kids!) from the car in front, then pull out and overtake. You need to get closer because the power available isn’t that great (esp in higher gears), so you get close to reduce the time to overtake. Do that in a Birkin and you’ll be unable to see around your target ;-)
Instead, hang back a little. You have all the power in the world to blast past the Lada puttering along in front, so you don’t need to finesse it up close.
Also, by hanging back, you can see up a potential queue of cars. Birkins are also great for overtaking multiple cars at once, but you need to make sure there’s a slot for you up ahead.
Overtaking
In a tank, you overtake by downshifting, planting your foot, then moving into the oncoming traffic lane and booting it until you’re past. Do this in a Birkin and you’re likely to embarrass yourself.
Think about it – changing lines involves turning, basically doing a chicane move with a quick right / left flick of the wheel. Now, when you approach any other corner, do you ever plant your foot and then turn the wheel? Ever? So why do it now? What will happen is you will overtake the car in front, but you’ll do it sideways. Then backwards. Then sideways again. I’ve had a friend do this and he got a free ride in a nice ambulance strapped to a backboard.
Something I've learnt is that there's always something new to learn. So you may read this and go 'idiot, who doesn't know that?', or perhaps even than I'm wrong. Or you may read this and say, 'I never thought of it that way before'. I guess this is aimed at people new to owning and driving a clubman, rather than race-hardened track pros. Particularly as its not anything to do with racing.
So here goes, driving advice from a guy with a car still in pieces.
When I bought my Caterham in the UK, one of the things that got me a discount off my insurance was to take a driving lesson with Cadence (http://www.cadence.co.uk/). These guys are professional driving instructors, but not your usual guy in beige trousers with a clipboad and a dual control Mitsubishi Colt. These guys teach proper and safe driving technique to drive 'progressively', as they call it. And it was probably one of the best things I did. It wasn't focussed on driving fast, it was focussed on driving safe. Driving a Caterham (or a Birkin, Westfield, Fraser, Robin Hood etc) is a different experience, both for the driver and other road users. And while you can't do much about other people being idiots, you can at least anticipate.
Note that there are a lot of parallels in driving a Birkin with riding a motorbike - keeping aware of where you are on the road, and particularly where you are in relation to other drivers. Also constantly asking - did he/she see me? And never, ever assuming they did. Because the 1 time in 100 that they didn't, the consequences in a Birkin are much more serious. Looking around, there are actually a lot of ex-bikers in clubmans, which probably helps keep the acccident rate down ;-)
Anyway, I went out a did this driving lesson in my new Caterham. They guy jumps in, tests a few things out (like the brakes), and off we go.
He then proceeds to demonstrate how to drive progressively. This is much the same as bikers do - moving quickly, but smoothly amongst traffic. The key point is to control what goes on around you, and not let others control you. In other words, you make sure you do not place yourself into dangerous positions, and most importantly, you don't let others do it to you. If you're just happily trundling along and someone puts you in their blind spot, get out of it!
Cornering
This is not a section on how to take a racing line - lots of other places for that, and people get upset when you take a late apex on Albany Highway. This is more about how to drive on a nice country road.
First, look through the corner, not at the corner. If you focus on just your apex, you'll hit the apex to within a centimeter, then hit the cow three feet further on. So constantly look through the corner to the exit, and flow through the apex, rather than drive at it.
Second, position yourself for the corner. On a left hander, move towards the middle of the road - the Birkin is a narrow car, so this gives you quite a bit of room to play with. Don't cross the line, but get into position. Brake progressively (don't stamp, but don't tickle the pedal) and change up to the right gear. Now, look through the corner and hit your apex, and progressively apply the loud pedal. On a right hander, do the opposite (but watch out for rough edges).
Oh, and if you think trail braking is a good idea on a public road, please let me know when you're out and about so I can avoid you.
The emphasis is on smooth rather than fast. This transfers weight from neutral to the front wheels under braking for more turn-in grip, then to the outside wheels for the turn itself. Keeping everything smooth means you have less chance of surprising yourself or others by rapid and unplanned changes of direction. It also gives you more options if something unexpected comes up.
Overtaking
Overtaking for a car such as a Birkin is pretty much an everyday occurrence, especially on open roads. Overtaking is of course a relatively dangerous manoeuvre when compared with just tootling along, but the risks in a Birkin are different to those in a normal car. Whilst we have more power (and therefore require less time to overtake), the nature of the Birkin means some additional techniques are required for safe overtaking.
Some things to consider:
Setting up an Overtake
We cannot see around other cars as easily. The usual approach to overtaking in a tank is to come up relatively close (but still a safe distance, kids!) from the car in front, then pull out and overtake. You need to get closer because the power available isn’t that great (esp in higher gears), so you get close to reduce the time to overtake. Do that in a Birkin and you’ll be unable to see around your target ;-)
Instead, hang back a little. You have all the power in the world to blast past the Lada puttering along in front, so you don’t need to finesse it up close.
Also, by hanging back, you can see up a potential queue of cars. Birkins are also great for overtaking multiple cars at once, but you need to make sure there’s a slot for you up ahead.
Overtaking
In a tank, you overtake by downshifting, planting your foot, then moving into the oncoming traffic lane and booting it until you’re past. Do this in a Birkin and you’re likely to embarrass yourself.
Think about it – changing lines involves turning, basically doing a chicane move with a quick right / left flick of the wheel. Now, when you approach any other corner, do you ever plant your foot and then turn the wheel? Ever? So why do it now? What will happen is you will overtake the car in front, but you’ll do it sideways. Then backwards. Then sideways again. I’ve had a friend do this and he got a free ride in a nice ambulance strapped to a backboard.
- Make sure you’re all set to overtake
- Move into the overtaking lane
- Now accelerate, not before
- Move progressively past the vehicle/s
- Lift off gently, and move back into your lane
Additional note – watch out for people driving by using their rear-vision mirrors. They will have noticed this amazing little car rush up to them in their rear mirror, and now it’s overtaking them in full song. I’ve seen some drivers get so mesmerised by this life-changing event that they forget they’re driving their own car. All of a sudden they’re drifting into the middle of the road watching you in their mirror while you’re trying to overtake!!!
Being overtaken.
I know, it never happens. Sure. But there are people on the road who think it’s a big thing to overtake a racing car. What they forget is how damn small the Birkin is, so as soon as the little car falls from view, they pull back in. Of course, they’ve misjudged and are trying to take your nose off. Watch for this!
Another risky thing is when you’re in a line of cars. Again, leave a very large gap between yourself and the guy in front. What happens is the idiot in the Commodore at the end of the line see’s what he thinks is a gap three cars up, tries to overtake, then finds you occupying the same space he was expecting to pull into. If you’re nose to tail, there’s nowhere for him to go, and it gets exciting. If you leave space in front of you, at least he’s got a chance.
And that's it. That's as far as my driving wisdom goes. I'll probably get written off by a truck on the South West highway whilst executing an illegal u-turn, and people will look back and this post and mock, but there you go. But it is important to understand some of the differences in driving a clubman, and I couldn't find anything on the web about it, so I thought I'd throw it out there myself.
/Constable Care Mode Off/
Monday, November 19, 2007
Sports Car Sunday
This weekend saw three Birkins head down to Rockingham (a suburb just south of Perth) for Sports Car Sunday, run by Shannons insurance in aid of Telethon. Lucky for me, I got to head down in the yellow Birkin you see below - a really well put together little car.


It was a pretty good event, with a few cars I recognise turning up, either from track days, or from the car show on Channel 31. Along with the usual contingent of Fords and Commodores, there was a large number of MR2s, Minis, a few exotics (Ferrari, Stratos etc), American muscle cars (and their eccentric owners), plus Elises, Japanese turbo monsters and so on.
Tell you what though, when the Birkins showed up the crowds soon followed:


Kerry's car, with it's polished skin and well sorted engine got a lot of attention, especially when the bonnet came off. The others were also inspected minutely, and it was good to see a few Birkin business cards get taken from the cars as well - hopefully the day proves to be the genesis of a few more Perth Birkins.
After that, it was back to Blair's place for a BBQ and a few beers (not too many ;-) Many thanks to Blair and Christie (not sure if that's the right spelling ;-)
A few other cars there:


Sunday, November 4, 2007
Zen and the Art of Engine Maintenance
Yup, this important step has begun. And with a bang, too.

There are a few things that need to happen to the engine before it can go in (and to the car too, but that's another post). The new cams give higher lift - cam designs these days (sure, like I knew what they were before) give higher lift and less duration for more power, better efficiency and lower emissions. Basically, the way the cams are ground means the valve open wider (better breathing) but for shorter periods. The science behind all of this really does escape me, as most websites start talking about flow rates and the effect of turbulence as described by fluid dynamics, and chaos theory as well (if a butterfly in Perth gets sucked into a throttle body in Perth, it causes hurricanes in the American mid-west, apparently).
Anyway, the upshot is that if the cams are taller (ie the lobes on the camshaft are bigger), then it stands to reason that they need more headroom in which to turn. So, to achieve this, little pockets need to be fly-cut in the top of the pistons so that the cams don't get fouled. This means removing the head to remove the old cams, and then getting the pistons themselves out to be cut.
Getting the top off the engine wasn't that hard - here's a photo of what it all looks like:

You can see the two cam shafts clearly in this photo - they're the two rods running down the left and right on the top of the engine. You can also see the lobes of the cam shafts, all offset from each other to open the fuel and exhaust ports in sequence. You can also see the chain that drives it all, as distinct from the Zetec which is driven by a rubber belt.
The new cams also come with adjustable verniers, which
allow minute adjustment of the cams and timing. This should mean that I get the most out of the new cams once they're installed.
The next step was to open the whole thing up to get at the pistons, which is where things got trickier. In order to take the whole thing apart, there's a main bolt at the front of the engine that needs to be undone. Now, the rotating parts on the bottom end of a Duratec are all pressed together- ie relying on friction to stop things from slipping. So far this is apparently very reliable, even up to hp and torque levels above where I'm going, however if the engine is coming apart, I'll get these sandwhiched parts keyed. This picture helps describe what this means:

OK, it's a crude representation, but you'll have to work with me and my poor left-brain dominant art skills.
The picture shows two cylinders. Now imagine that the dark blue cylinder spins, and through friction the light blue cylinder spins as well. However, you can imagine that if you apply enough force to overcome friction, you could force the two to slip. Given that this is an engine, where all sorts of components have to move in some complex little ballet, this would be bad. For example, if the crank gets out of sequence with the cams, you'll get all sorts of weird things happening.
If you add a key, however, this is what you get. A groove gets cut and a key added. As you can imagine, this means that the two disks can no longer slip, giving a more reliable engine under power.
OK, enough of the amateur mechanics, and back to the story. In order for all of this to happen, there's a bolt. As you can imagine, when Ford put all this together, they didn't want things to slip for 200,000km or more, so there's a bit of torque applied to this bolt. Getting it undone would require some force. Here's a photo of the delicate instruments and techniques used to achieve this.

In case you're wondering, what has happened is the guy on the left has just taken an almighty swing with that lump of wood at the spanner on the bolt, and the guy on the left is trying to make sure the engine doesn't turn over. This, and several other violent attempts, didn't work. Ford know what they're doing when they build these things ;-)
The answer, apparently, is a rattle gun - a tool powered by an air compressor that applies a huge amount of force (1000ft/lb of torque) to turn a nut. It's the same sort of tool used by F1 pit crews to remove and replace wheel nuts. If that doesn't shift it, nothing will.
Oh, and in other news, I finally bought a new camera, so the photos on the blog should improve. And if you're wondering how I managed to cut everyone's heads off in the previous photo - that was deliberate. Not everyone wants their face plastered all over the web......
Subscribe to:
Posts (Atom)

 people.