So, I've finally managed to do what I've been threatening all along, and taken a long holiday to work on the car. So there had better be some progress to show for it.
Apart from a few invisible things (like wiring up the car horns), the major activity over the past three days has been in getting the boot cover and tonneau on. This involves drilling a large number of holes in the body of the car, with all the exciting possibilities of skipping a drillbit across the nicely painted surface. It's the sort of thing you want to psyche yourself up for, really.
The first thing to do is to mark out where you're going to drill. The way I approached this was to put masking tape around the top of the boot area, then measure out where all the holes go. Then measure again. Then step back and take a look by eye, do some more measuring, move a few holes, and measure again. You only get one shot with the drill, after all.
There are some decisions to be made - stick with the book measurements, or go for your own? Black or silver poppers? I decided to mainly stick with the book, which has quite a few poppers around the edges, including some on the corners, as it reduced the likelyhood of any odd pulls where I might make a mistake. I also went for the black poppers - what the hell, they can be changed later.
So, out with the drill, and 26 holes later, all was well. Then it was just a case of riveting in the base of the poppers to the skin, remembering to use a small washer behind each rivet. There's also a risk of skipping here - as the rivet breaks in the gun, it might jump out of the base and hit the skin - only did this once and it's barely noticeable. Did stop for a cup of tea after that one, however ;-)
Then you glue the boot cover to the back of the car, using the same glue as in the carpets. Wasn't enough to muck about with my head this time, luckily. You then need to get the cover over the back and line up the other part of the popper - again, check and check again. Start with the corners, then the outer points, then do the middle points. After a few demos from Frank, it was all done in a little over a day. Which is pretty slow, but I took my time and I reckon I did a good job of it. After wetting it down to allow it to shrink a little, it's as tight as a drum.
The next bit is the toneau, which covers the cockpit. You can either have the whole thing covered (which keeps the rain out), or just the passenger section. Same process as before. One point to note is that the car comes with the popper bases already in the padding over the scuttle - you need to replace these, as the lip on the base is too short, so the tops can't gain enough purchase on the base to hold the tonneau in place. This, plus the fact that the bases sit deep into the padding means the tonneau kept falling off until I fixed this.
All in all a good job, I reckon.
The most astonishing thing about finishing this was Frank saying "oh well, its ready to go onto its wheels now", which I thought was a way off, but apparently not ;-)
Oh, and there are lots of photo's (new camera and everything), but I'm at my parents place in the country, and Telstra believes that 128K is a perfectly acceptable speed for "broadband"....so they'll be up once I get somewhere civilised.
The Birkin
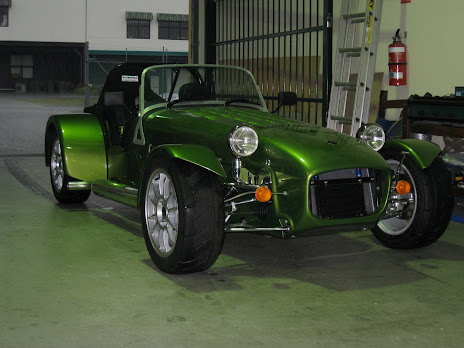
The finished article
Subscribe to:
Post Comments (Atom)

 people.
No comments:
Post a Comment