I did a google search on Duratec engines, and came up with the following link:
http://www.jackals-forge.com/lotus/duranail.html
This guy has basically build the same car I am, apart from the diff and gearbox. He has the 220bhp Raceline setup, DTH Jenvey throttle bodies etc. It's a good little page from someone who knows his cars.
Hopefully I have as much fun as he obviously has, although if you check out the rest of the site, you'll also see what it looks like once you've run it into a wall at Spa, so something else for me to take note of.....
The Birkin
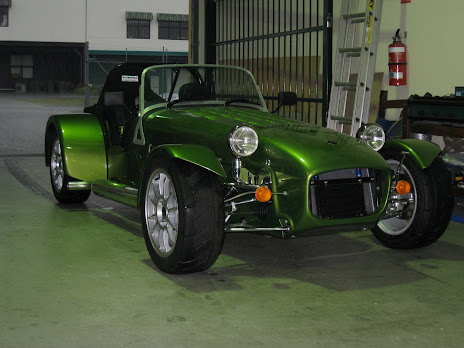
The finished article
Thursday, October 18, 2007


Saturday, October 13, 2007
Hartley Enterprises - V8 for a clubbie
Frank pointed me to the following website:
http://www.h1v8.com/
These guys have bolted two Suzuki Hayabusa engines together, and made a 400bhp engine that revs over 10,000 rpm on stock everything. Madness. They have quoted a price under $USD30K for the whole thing - hmmm, upgrade, anyone?
According to the website, it does tend to break traction in nearly every gear, which would make it a handful to drive, I would imagine. Or that may just be sour grapes.....but in the video's the back end does step out a lot, even when he's not pushing it.
http://www.h1v8.com/
These guys have bolted two Suzuki Hayabusa engines together, and made a 400bhp engine that revs over 10,000 rpm on stock everything. Madness. They have quoted a price under $USD30K for the whole thing - hmmm, upgrade, anyone?
According to the website, it does tend to break traction in nearly every gear, which would make it a handful to drive, I would imagine. Or that may just be sour grapes.....but in the video's the back end does step out a lot, even when he's not pushing it.
Suspension and carpets
As I write this post, you'll have to excuse any typos or grammatical mistakes, as I'm off my nut. However, more on that later.....

Been doing quite a bit of work this weekend, but for the most part you wouldn't notice. First, I've redone the back end. When I did it the first time, it was with the intention of having to remove it all to fit the differential in, however it appears that with the smaller Subaru differential, you don't have to remove the plate which supports it at the back - it can be maneuvered in with everything in place. So that means I can get all the bolts into place properly to hold the upper and lower wishbones in place.
Easier said than done, of course. The basic idea is to get a bolt through a bracket, with a washer on both sides of the bracket. If that isn't clear, here's a picture:
OK, so that isn't the prettiest of pictures, however you get the idea. Anyway, the problem is getting the washers in there (it can be a tight fit), getting them to stay there, and in most cases getting everything (bolt, washers and holes) to line up to get the bolt through takes some effort. So I referred back to one of the previous lessons - don't be afraid to hit it with a hammer. Hard. And sometimes that even worked ;-) Other tricks included sticking an 8mm allen key through the other side an using that to lever the arm and move it around to get things aligned, and using screwdrivers etc to allow me to hammer the washers in from the side.
However, after some perseverance, it all went in. There's only one spot where it didn't go perfectly - the two inside washers ended up on the same side. That's just the way the arm wanted to sit. I had to remove the uprights, but that's OK, as they were going to come off anyway to get the halfshafts in (once the diff is in, which is waiting on the moving of the brakelines.....)
After that (and the usual time for standing around talking - it is a shed after all), came putting the carpets in. And this is where the light-headedness comes in.
First, I needed the glue to keep it all stuck down. So off to Bunnings, where I find the glue locked in a cage. When I ask why, it's because people buy it to sniff it. I assume the kid decides that I'm an upstanding member of society and not likely to be a glue-sniffer (dunno why - I'm in my usual Saturday uniform of an old t-shirt with holes in it, cheap trousers and trainers) and hands me a tin. I also grabbed a few $2 paintbrushes to sacrifice.
Back to the workshop, and prefitting the carpets. Only a bit of trimming required - the carpets were cut for the longer footwell for the passenger. If you recall, all footwells from now on have been shortened to allow for Duratec installation.
The glue itself then goes in. I'd masked everything up beforehand, as the stuff is apparently lethal and gets everywhere, and I can imagine putting a dollop on top of a screw or down on of the threaded holes for the seats and mucking it up. It's at this point that the fumes hit me.
The tin warns that it should only be used in well ventilated areas - they must mean outside in a gale, because under any other conditions, this stuff is potent. I'm applying it into a small space inside a clubman, so it tended to hang around. Plus you have to get your head right in there to get the glue to the front of the footwell. Once I'd finished the passenger side, I was feeling it, and the drivers side finished me off.
However, it's all in there now (and boy, it's not coming out, I can tell you). Yet one more thing completed in the build.
And now I'm off to lie down. And not operate any heavy machinery......
Tuesday, October 9, 2007
New item on the site
I've also added a list of Things to Do on the right hand side - gives some idea as to what I'm planning on doing. Note that the list is not sorted (some things tend to happen when nothing more exciting is happening).
I've included some things that may not happen at all, but are just ideas at the moment.
I've included some things that may not happen at all, but are just ideas at the moment.
Rollbar is on, temporarily
OK, so I had a few hours spare yesterday, so dropped into the workshop to say hi to Frank. Clearly you cannot come in and NOT do something, so I've fitted the rollbar and the rear mounted brake light.
The rollbar itself is a bit of a story. The one that came originally didn't fit at all. Apparently having the two arms that attach to the back of the car not quite perfect isn't unusual - they can be pretty easily bent a little (not too much - it is a rollbar after all), and you can fit spacers if you have to. The problem with mine was that it was the main bar (that goes from side to side in the car, and is MUCH thicker and stronger) that was out. By quite a bit.
Turns out there was a breakdown in the process in the factory. The guy responsible for putting it all together didn't follow the Standard Operating Procedure, and was tacking the bar (ie. welding little spots on to hold the pieces in place) in the jig, but then removing it and completing the job off the jog. Now when you heat these things again, everything can shift, so the final geometry of the bar tended to bit a bit of potluck.
The next batch were all a lot better, and in most cases now go straight on no problems. My new one goes on find (a little bit of filing required), and the two arms are close, but there's still some work to do there.
With the bar and bootbox in temporarily, this was a good opportunity to fit the rear stop light. Given the height of the main stop lights on the rear guards, and the overall lack of height in the car, I'm guessing this is the main indication to people behind you that you're stopping. I've read a few stories of people in clubmans being rear-ended, and the explaination was that the guy behind was so interested in the car, he forgot to stop. So a bright red light may prove useful.
Anyway, it's an easy matter to position the mounting bracket, drill a few holes, and get it all stuck on. Again, learnt a few more things, like how to pick the right drillbit, and how to thread a hole (slowly and with patience).
 Now that this is done, it can all come off again and be sent off for chroming - again, Kerry will do the honours. Should look great when it comes back all shiny. And yet another thing to shine in the eyes of people coming up from behind so they don't hit me.
The rollbar itself is a bit of a story. The one that came originally didn't fit at all. Apparently having the two arms that attach to the back of the car not quite perfect isn't unusual - they can be pretty easily bent a little (not too much - it is a rollbar after all), and you can fit spacers if you have to. The problem with mine was that it was the main bar (that goes from side to side in the car, and is MUCH thicker and stronger) that was out. By quite a bit.
Turns out there was a breakdown in the process in the factory. The guy responsible for putting it all together didn't follow the Standard Operating Procedure, and was tacking the bar (ie. welding little spots on to hold the pieces in place) in the jig, but then removing it and completing the job off the jog. Now when you heat these things again, everything can shift, so the final geometry of the bar tended to bit a bit of potluck.
The next batch were all a lot better, and in most cases now go straight on no problems. My new one goes on find (a little bit of filing required), and the two arms are close, but there's still some work to do there.
With the bar and bootbox in temporarily, this was a good opportunity to fit the rear stop light. Given the height of the main stop lights on the rear guards, and the overall lack of height in the car, I'm guessing this is the main indication to people behind you that you're stopping. I've read a few stories of people in clubmans being rear-ended, and the explaination was that the guy behind was so interested in the car, he forgot to stop. So a bright red light may prove useful.
Anyway, it's an easy matter to position the mounting bracket, drill a few holes, and get it all stuck on. Again, learnt a few more things, like how to pick the right drillbit, and how to thread a hole (slowly and with patience).
 Now that this is done, it can all come off again and be sent off for chroming - again, Kerry will do the honours. Should look great when it comes back all shiny. And yet another thing to shine in the eyes of people coming up from behind so they don't hit me.
BTW: Apologies for the poor quality of the photo - I'm still on the hunt for a new camera, and the phone camera is having to do for now.
Monday, October 1, 2007
Odds and Ends
More work on the weekend, completing little jobs around the place.
For example, putting the ignition switch on. Sure, a ten minute job, but now you can turn a key and imagine it running! OK, that's a little sad.....The idea of relocating the switch is going to have to wait, as ADR apparently requires a lockable steering column, so the existing barrel will remain where it is.
I've also finished (or at least, fitted) the pedal box. Last week it got moved towards the front of the car to give the maximum room possible for the driver, and this week the pedals got connected to the cylinders. Took me a while to figure out that the threads on the pushrods were a completely different width (guage? pattern?) to the threads on the pedals. I spent some time cleaning the threads thinking it was that, but eventually eye-balled it and decided they were completely wrong. That's when the box of bolts Frank put on the car suddenly made sense - they were to replace the pushrods.
That turned out to be a simple task, but again if I didn't have someone to tell me what to do, I'd have spent another few hours beating my head against the wall.
That done, the pedal box now looks correct as compared to everyone elses. The real trick will come once the disks and brakes are on and the lines are bled, so that I can set up the balance bar. The only thing that's worrying me at this stage is that there's not a lot of room for adjustment in the middle cylinder, so if that needs more movement than the current pushrod allows (it's a little short) then I'll have to take it apart again and redo it later - but on a pressurised system.
I've also sorted out the fusebox, which was another exercise in frustration. The new model Birkin's have a shortened fusebox - earlier models had a wide, flat fusebox with lots of access from the top, so you could lay everything out. The new versions have theirs shortened to allow the Duratec engine to fit, but it means that they're deep rather than wide. Add to that the fact that the wiring is pretty damn tight, and it makes it a exercise in frustration trying to manoeuvre everything in there.
So I did what I always do, and cheated. Luckily there's another short fusebox chassis in at the moment, so I had a look at what he did and copied it. Worked a charm. On that note, Blair (the other IRS in the workshop) has been in working hard over the past few weeks, so if I'm not careful my main reference point (i.e. build to copy off) will be gone soon.....
So that's now all in place and covered over - the fibreglass cover is hiding a multitude of sins, but I don't care.
Mind you, seeing how long it takes to get these things finished, and how long the engineering and registration process can be, I'm getting worried for my December deadline. That may prove to be optimistic, unless everything goes really, really smoothly from now on. We'll have to see.
For example, putting the ignition switch on. Sure, a ten minute job, but now you can turn a key and imagine it running! OK, that's a little sad.....The idea of relocating the switch is going to have to wait, as ADR apparently requires a lockable steering column, so the existing barrel will remain where it is.
I've also finished (or at least, fitted) the pedal box. Last week it got moved towards the front of the car to give the maximum room possible for the driver, and this week the pedals got connected to the cylinders. Took me a while to figure out that the threads on the pushrods were a completely different width (guage? pattern?) to the threads on the pedals. I spent some time cleaning the threads thinking it was that, but eventually eye-balled it and decided they were completely wrong. That's when the box of bolts Frank put on the car suddenly made sense - they were to replace the pushrods.
That turned out to be a simple task, but again if I didn't have someone to tell me what to do, I'd have spent another few hours beating my head against the wall.
That done, the pedal box now looks correct as compared to everyone elses. The real trick will come once the disks and brakes are on and the lines are bled, so that I can set up the balance bar. The only thing that's worrying me at this stage is that there's not a lot of room for adjustment in the middle cylinder, so if that needs more movement than the current pushrod allows (it's a little short) then I'll have to take it apart again and redo it later - but on a pressurised system.
I've also sorted out the fusebox, which was another exercise in frustration. The new model Birkin's have a shortened fusebox - earlier models had a wide, flat fusebox with lots of access from the top, so you could lay everything out. The new versions have theirs shortened to allow the Duratec engine to fit, but it means that they're deep rather than wide. Add to that the fact that the wiring is pretty damn tight, and it makes it a exercise in frustration trying to manoeuvre everything in there.
So I did what I always do, and cheated. Luckily there's another short fusebox chassis in at the moment, so I had a look at what he did and copied it. Worked a charm. On that note, Blair (the other IRS in the workshop) has been in working hard over the past few weeks, so if I'm not careful my main reference point (i.e. build to copy off) will be gone soon.....
So that's now all in place and covered over - the fibreglass cover is hiding a multitude of sins, but I don't care.
Mind you, seeing how long it takes to get these things finished, and how long the engineering and registration process can be, I'm getting worried for my December deadline. That may prove to be optimistic, unless everything goes really, really smoothly from now on. We'll have to see.
Monday, September 17, 2007
Further progress
Hi y'all.
Further progress has been made in some small areas. Firstly, the dash wiring is basically in now, with some clips supplied by Paul making the whole thing a lot neater. I still need to drill a hole for the indicator light, but I'm going to wait until I decide on whether I'm going for LED lights or not. If I go LED, then the indicators require two lights (one left and one right). If I stick with bulb lights, I only need one to indicate that an indicator is on. When you turn the indicators on in a clubman, they're set up to make a horrible noise to remind you - no nice soft clicking sound like in other cars - because there's no cancel on the steering wheel to turn them off once you've completed the turn.
I've also completed the front steering mounts, including getting the sway bar roughly located in place with the reinforcing plates are now all bolted in. I've also fabricated some little aluminium brackets for the fan and mounted it on the radiator, which is now also mounted on the car. Just a tip to the unwary - you need to turn the fan around. It's default position would have had the poor thing trying to blow air back towards the front of the car - not the most efficient setting.
I've also moved the pedal box to its farthest position, and fitted the pistons for the pedals. I'm still missing the joints to fix the pedals to the pistons, but its all there ready to go.
So that's not bad progress. I've started to make a list of the next steps to take, and there are a few things that need to happen before I can move on some of the suspenion components (machining a few spacers etc), but its moving forward.
Further progress has been made in some small areas. Firstly, the dash wiring is basically in now, with some clips supplied by Paul making the whole thing a lot neater. I still need to drill a hole for the indicator light, but I'm going to wait until I decide on whether I'm going for LED lights or not. If I go LED, then the indicators require two lights (one left and one right). If I stick with bulb lights, I only need one to indicate that an indicator is on. When you turn the indicators on in a clubman, they're set up to make a horrible noise to remind you - no nice soft clicking sound like in other cars - because there's no cancel on the steering wheel to turn them off once you've completed the turn.
I've also completed the front steering mounts, including getting the sway bar roughly located in place with the reinforcing plates are now all bolted in. I've also fabricated some little aluminium brackets for the fan and mounted it on the radiator, which is now also mounted on the car. Just a tip to the unwary - you need to turn the fan around. It's default position would have had the poor thing trying to blow air back towards the front of the car - not the most efficient setting.
I've also moved the pedal box to its farthest position, and fitted the pistons for the pedals. I'm still missing the joints to fix the pedals to the pistons, but its all there ready to go.
So that's not bad progress. I've started to make a list of the next steps to take, and there are a few things that need to happen before I can move on some of the suspenion components (machining a few spacers etc), but its moving forward.
Subscribe to:
Posts (Atom)
 people.