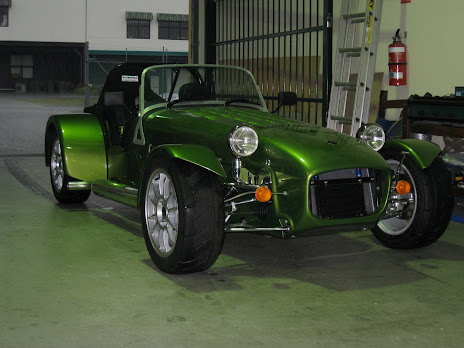
The Birkin

The Birkin
The finished article

Monday, March 19, 2007

Australian F1 Grand Prix 2007

No work on the Birkin this weekend, as I was in Melbourne for an engagement party, wedding (different people!) and the F1 Grand Prix. The first two lead to late nights and sore heads, but that's a story for a different forum. This blog's about cars.....

I've never been to an F1 GP. I've been in a few countries when they've had one running (UK several times, Bahrain etc), but F1 has not been of much interest to me really. It's not racing, it's a procession of cars with few actual battles, chances for competition etc. I think the race is won in the strategies employed and in the pits, which for me isn't much fun. I also think the budget of the team has too much influence over the outcome, which isn't an unusual feature in expensive sports, but seems to have a big influence here (I'd like to have seen how Michael Schumaker would have done in a Minardi or Spyker).

That said, when it worked out that I'd be in town for the Aus GP, I thought I'd make the effort. AUD100 per ticket (as compared to GBP100+ in the UK), plus the ease of getting to and from etc made it worth the cost and effort.

I won't give a blow by blow account of the race - because I had no idea what was going on. The start was great, and the sheer noise was incredible, but the effect of a few laps and the earplugs you really should wear reduce the impact. After that, it's just a series of cars all following the same lines as each other. I'd be interested in knowing how many competitive overtaking manouevers there were after, say, the first five laps. Competitive as distinct from back-markers being overtaken, or being overtaken whilst in the pits. There'd have to be very few. Ok, Massa from the back of the grid pulled past quite a few, but he was there because of an engine change. And we didn't see any of it anyway, as the cameras are elsewhere watching Kimi add 1.2 seconds a lap to his lead. How dull.

But hey, maybe on telly it was a race full of excitement and drama - it's just from trackside you see so little of the entire race, and you're just waiting for someone to do something, anything, in your little bit of the track.

In addition, with the new rules making the cars slower but more reliable, you also don't have the thrill (or frustration) of someone holding on to a position, but losing it to mechanical failure. The risk is still there, but much reduced. What this seems to mean is that

Compare this against other forms of racing, like BTCC and rally. BTCC is bumper to bumper, cars touching, overtaking is common, and the times are pretty close from the front to the rear of the field. Rally driving is fast and loose, with anything possible at any time. Hitting a rock, putting a wheel over a cliff, all outcomes possible either due to chance or driver error. Much more fun.

So I think F1 has a place in that it's the (supposedly) pinacle of motorsport racing. But from my point of view, there are more exciting, more accessible and better value options out there. I might go again to see if I could get something more out of it next time, but I think I'll stick to watching it on telly from now on.

Wednesday, March 14, 2007

Go Faster Bits

With a dearth of interesting things to write about, I thought maybe a short piece on all the toys I have coming over from the UK might be in order.

As per a previous post, you can take a perfectly good engine and turn it into a complete monster, as long as you have enough money. Now I don’t, and I also want a car that I can still drive, rather than some 300 bhp beast that scares the hell out of me. So I’ve gone for a package of items that should take the car to 220bhp or thereabouts.

But what do you need to achieve this? The shopping list for my 2.0L Duratec is as follows:

  • Direct to Head Throttle Bodies – these replace the standard air intakes with individual trumpets. This means that each cylinder will have less trouble breathing, leading to more power and a better power curve. Comes with mounting kits etc.
  • 220bhp Cams with verniers – simply, these determine the timing and lift of the valves on top of the engine, leading to better breathing / exhaust etc. Also putting in uprated valve spring sets.
  • OMEX 600 Series ECU – the brains of the car, giving good flexibility in terms of things like fuel ratios, timing advance, redline etc etc.
  • Wet Sump kit – this takes a few centimetres off the bottom of the car, adding to the clearance. If you look at a clubman from down low, you’ll nearly always see the engine protruding underneath. With such a low car, this is an invitation to smack into anything slightly taller than a leaf. A low speeds (like speedbumps) you can get away with it, but hit something at speed and you’re asking for broken engine mounts, cracked sumps, and spectacular repair bills. It will also help with the 100mm ADR ground clearance requirements.
  • AP Lightweight flywheel and clutch – the flywheel sits on the engine transmission, and is the thing that ensure when you put your foot on the clutch (and off the accelerator) the engine revs don’t just stop. The flywheel contains kinetic energy that keeps the engine spinning. Of course, you need the engine to put the energy in there in the first place, so a heavy flywheel saps power during acceleration. A light weight flywheel means it takes less energy to spin up, to you go faster. The theory is that hills etc will cause a problem (the flywheel contributes it’s energy to help you climb under load), but the Birkin weighs nothing, so doesn’t need that. The clutch is an AP racing model, again lighter weight for similar reasons.

There are other things that need to come along with this stuff – bolts, water rails, fuel rails etc that are either there because they have to be or because they look pretty.

Another point that’s sometimes not mentioned is that with more aggressive cams you need to pocket the pistons – essentially each piston needs a groove ground out of the top in order to allow the cams to turn, otherwise they’ll foul with all sorts of exciting results. And if the pistons come out, you may as well key the crank, and if you do that you may as well port and polish the head – so it’s a minor rebuild. But the idea is that the engine will be not only powerful but strong. I’m not keen on the idea of a highly strung engine that needs a rebuild every 10K. I also don’t like the idea of the crank letting go and destroying the engine block, as it’s aluminium and when they break, it’s a new engine.

So the engine package I’ve opted for should provide a nice, smooth power band with as much power and torque as I could possibly ask for, whilst still remaining reliable and tractable. Truly an everyday supercar.

As an aside, I went to Crown Casino the other day and saw they had a Ferrari exhibition. They had an F40 on a stand, and whilst it’s top speed was far beyond what the Birkin can achieve (without dropping it off a cliff), I took a great deal of pleasure knowing I’ll get to 100 faster than it will.

Now all I need to do is find myself up against one at the lights……

Tuesday, March 13, 2007

Still unbuilding......

The problem with this stage of the project is that everything seems to go backwards. Plus it isn’t photogenic, unless you really want to see what a bracket looks like once it’s been ground down. However…..

The main activity at the moment is to get the car prepped for painting. As mentioned before, this involves pulling everything off that can be reasonably removed, and drilling some holes. I’ve replaced the fuel filler cap with a much nice, flush mounted model from Meridian Motorsport. And OK, I know I was a little uptight about getting it straight, but you get one shot and it would have driven me insane to get it wrong….

The bonnet clips are off, and I’m looking at replacements. The one’s everyone else are using aren’t supplied in WA any more, so it’ll be the US or UK for those ones. I also rather like the spring-loaded ones – except that the OMP units I’ve looked at look huge and chunky. I guess having them nice and solid is what’s important, but still…..perhaps if I chrome them up.

There are a few more things to do before it goes to the painter – I need to drill some small holes in the back for the number plate light, but most importantly I need to cut the hole for the exhaust. Birkin are now shipping cars with no exhaust holes cut, so they can be set up for exhausts on either side. What they haven’t sent yet is instructions on where to cut the hole! Kinda important.

Mind you, John Watson (Birkin’s founder) was in Perth the other week, and he’s promised these will be available shortly. Of more interest is the ram air pod unit that’s being developed – this is a tube-like construction that sits over the throttle bodies, and provides a smooth, consistent airflow over all the TB’s rather than having the front intakes steal airflow from the ones behind. Plus, I think it looks really cool ;-) You can see some photos of what this might look like at http://www.birkin.com.au/imageview.php?iid=2092 – this isn’t the final version, as it’s a unit bolted on from another vehicle class. Hopefully the Birkin model will be a lot slicker.

One day soon I shall be bolting a piece on rather than drilling it off - can't wait for that day. In the meantime, I'll be taking a short break to attend and engagement party, a wedding, and the Australian Grand Prix all in one weekend. Two-Day Hangover + F1 Cars = Bad Idea, obviously, but oh well....

Monday, February 26, 2007

Day 2 - taking more bits off

OK, so it's in the workshop, and now it's time to prep it for painting. Which basically means deconstructing it further, and feeling like I'm going backwards instead of forwards.

Having said that, it's also a good time to start improving some of the elements on the car. The standard fuel filler cap, for instance, is a complete travesty and should only be considered a stop-gap measure until something better can be fitted. So once the fuel tank came out, I drilled the four rivets and a new fuel filler cap is on order from Meridian. They do a nice flush-mounted alloy filler cap that will sit far better with the overall look of the car.

Mind you, as I was drilling these out Frank glides past and screams "be careful, you're drilling into the car" or some such thing, which is precisely what I was thinking. I might need to become a little less tentative.

Other activities included removing the standard bonnet clips, as they were dodgy and a bit tacky. These will be replaced with the rubber style clips that are slightly larger, but are less obvious and feel like they might actually hold onto the bonnet.

Other tasks included rasping out holes for the windscreen wipers, removing various bits of rubber, and taking the rear splitters off.

The other thing that became apparent was that I need to think longer and harder about the paint scheme. It's all very well and good to say "I want green", but what about the rest? The rollbar, the front suspension, the windscreen surround, the splitters etc. If I chrome stuff, do I go shiny or more like polished aluminium? Do I want the engine bay painted complementary colours etc etc? So more thought required.

But, it's moving forward. Next week should see the last jobs done before it gets sent to the painters, then there'll be a hiatus for a few weeks, during which time the parts from the UK should have arrived, so at least I'll have some new toys to play with.

Monday, February 19, 2007

....and once more back to Perth

Well, nothing was happening on the car, plus I was getting a little concerned that there was little that I could really achieve until the car was painted. I mean, I was bolting in all sorts of things, but not torquing them up because it all had to come out again once it was ready to paint, so why not paint and then build it once? Could take a long time otherwise....

So the car came back to Perth yesterday, bolted onto the painting frame and on a trailer. It was an extremely odd drive, with the nosecone about a foot from the rear window and just over the roofline of my brother-in-laws car. Also got a few looks from people passing by.....


Anyway, it's now back in Frank's workshop - this weekend I'll be in drilling and prepping, then it will be off to the painters. The intention at this stage is still to paint it Hothouse Green, but I'm wondering what that would look like with copper threaded through it. Might be more trouble than it's worth, but I'll have a chat to the paint guy and work something out.


Once that's done, I'll be able to put things into the car for real and stop pretending ;-)

Monday, January 29, 2007

Fastlane Driving School

A lot of what people tell me about going fast is that it doesn’t matter how many ponies are under the bonnet, it’s about the skill of the driver. Having watched that Top Gear episode where Sabine Schmitz drives a diesel transit van around the Nurburgring, I can well believe it.

Plus, my Dad seems to like driving fast, so why not combine the two, I thought. So I bought Dad a day driving Formula Fords at Waneroo Raceway for Christmas, and thought I’d treat myself as well.

The whole day was pretty slickly run – first, you get divided into groups based on height and build, so that they can put you in a car with something close to what you need. After a bit of heel-and-toe practice in the car, you get taken out in an SS Commodore for a run of the track.

The organisers had helpfully put out little signs indicating where to brake and change gear for each corner. At this stage, the only observation I could make was that the braking zones appeared to start rather close to the corners themselves…..

Anyway, after that it was back to actually drive the cars. The Formula Fords we were driving were powered by 110bhp Ford Crossflow engines – relatively common a few years ago in Clubmans, but now superceded by newer engine designs. However, given the weight of 420 kg, this is enough to propel them to 100kph in under 5 seconds. Strangely, given that I’m after a 220bhp car that weighs around 600kg (but with a higher drag) the performance in a straight line should be similar to the Birkin. They'll probably go around corners faster.....

So, first out is 10 laps behind a pace car – fairly tame, but useful for working out the racing lines and practicing the gear changes.

The next 10 laps are on your own, where you are supposed to gradually feel your way into the performance of the car. Bugger that. I prefer to rush into these things and find out where the overlap between driver confidence and ability ends, so of course I spun out on the first lap. However, it did give me a feel for what the car does when it lets go, which will prove useful later on.

After lunch, another 10 laps were spent doing timed circuits, and this is where Fastlane differentiate themselves from other trackdays I’ve been on. You get some pretty decent feedback from guys who actually race these things professionally, so they can tell you what you’re doing wrong at which points. As long as you listen, you can make some pretty serious inroads. I’d started out in the mid-60’s early on in the time sessions, but was down to 59 seconds a lap by the end.

After that, it was the serious business of the timed race. Obviously, they don’t let you rub bumpers with each other (only two overtaking zones allowed, both on long straights), so the timed sessions were used to space us out to avoid traffic. However, after some final advice, they basically let you out to go as fast as (safely) possible. Spinning out, however, meant disqualification, as the idea was to get the lowest average time over 10 laps.

And the result – need you ask? I was damn pleased to see an average time of 58.6 seconds, and a fastest lap of 57, which is only a few (but extremely hard to find) seconds off something competitive. Got a little trophy and everything. Dad’s laptimes were rapidly improving by the end, and with a few more laps would have been pretty competitive.

Overall, I reckon the Fastlane operation was the best trackday I’ve done by far. Most other times they just bolt you in and give you all sorts of dire warnings about crashing, then let you loose. Fastlane treat this as a school, so you’re there to learn and improve rather than just go as fast as possible. I actually learnt something about driving, the capabilities of the cars and my own driving style that day, which will stand me in good stead with my own car. I'd recommend them to anyone in the Perth area looking to improve their own track driving, esp with a Clubman.

Monday, January 15, 2007

Day 1 - Taking it apart and putting stuff on

OK, so the build has started - by taking things off. My six year old nephew was a little non-plussed that by mid-afternoon it still wasn't finished. He seemed to take comfort in the fact that it would have been, but I'm missing a few pieces. In order to keep the peace I think those pieces will remain missing for some months.....

So, the nose is off, as is the scuttle. Nothing tricky there. However, in order to feel like I've actually achieved something, I though taking the first steps of installing the steering rack and front wishbones would at least show some progress.

The chassis arrived with most of the steering already installed, although I will be giving everything a good torquing to later on when I get a torque wrench. So it was just a matter of removing some more stuff and bolting the one extra part in.

And it's now that I understand why these things take a year. Dad and I must have put that thing in six times, each time realising that this bit should actually go over that bit, or that to put this in, week needed to have done this and that in step 1. All I can say is thank goodness for digital cameras.


It's probably also worth describing my build sequence at this point as well. The idea is that the build will go in, say, four stages:

  • Stage 1 - prebuild. Dad and I will fit everything possible to the car, making sure we have all the bits etc, but will not tighten anything to it's final levels at this stage. We'll drill the holes for the tonneau, windscreen washers and bottle, seat rails etc, fit the rollover bar, suspension etc. The idea is to get a rolling chassis. This will also give us something concrete to start planning colour schemes etc.
  • Stage 2 - paint. The car will head back to Perth, get put on the paint stand, and have most of the various bits removed before painting.
  • Stage 3 - rebuild. The car, once painted, will be rebuilt from the start and everything torqued up, nylocs etc replaced where required etc. After Stage 1, this should be a meccano set build.
  • Stage 4 - drivetrain, wiring etc. The final bits and pieces.
May seem a little slower (there are two Birkins in Perth that were delivered a few weeks prior to mine that are almost finished....) but time ins't the important thing here. I say that now, of couse.....

Anyway, the steering rack eventually went in, although it's not a terribly good fit, and I'm assuming that the aluminium blocks holding the rack will crush in around it to hold it secure.

The upper and lower wishbones were also a simple plug and play operation, albeit with a few exertions to get the ends into the brackets. It's a tight fit in there ;-) I'm just waiting on the front sway bar and shocks / springs to arrive before these are fitted, along with the uprights. Then I can put the wheels on a see what they look like.....but now, looking at my hectic social calendar, plus time commitments from my MBA, it will be a few weeks before I get back to the build.

However, there's still the engine to talk about, plus a few car related events to occur between now and then, so my faithful 150 readers, stay tuned ;-)