The Birkin

The Birkin
The finished article

Saturday, April 26, 2008

Oil lines

Now that the engine is in, I've installed the remote oil filter and oil lines. The remote filter takes the oil filter from the bottom of the engine (where it would have stuck out below the sump) to the front of the car where it can be kept out of the way. Given that the car is also going to see some track work, I've also installed an oil cooler.

This is the Eurospeed plate that covers the oil ports in the engine. Originally, these ports fed the standard oil filter housing. The other fitting is an oil pressure guage - I've fitted the guage to the dash by drilling a new hole and moving the fuel guage to the far right. Now I have oil pressure and temperature guages in my line of sight while driving.

This is the remote filter mounting, which has been bolted up near the steering rack. This will keep the oil filter out of the way, while still leaving it in an easy to get to position for changing filters.


Here you can see the oil cooler. I made up the brackets top and bottom to hold it all in place, using rubber mounts to isolate the oil cooler from vibration. On the road, a cooler of this size will probably cool the oil too much, so I'll make up an aluminium blanking plate to cover about half of it up.


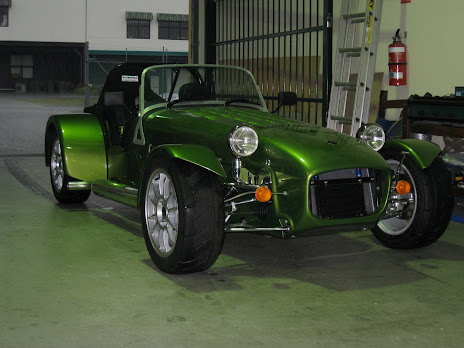
This is the car with the nosecone fitted - the cooler and lines all clear, which is handy. I may paint the oil cooler bracket black at some point to make it less conspicuous.


Sunday, April 20, 2008

The exhaust system

The exhaust went away for chroming with Kerry, and has come back polished to perfection. So I've fitted it up to the engine to see how it goes in, and whether the hole is in the right place.

Unfortunately, the hole needs to be widened slightly. Nothing significant, perhaps 20mm towards the top and left and side, but there you go. So Frank will have to get out with the snips and take some more of the car out ;-)

But it all looks really nice and shiny.

The Engine is In

Finally, the engine has been installed. Actually this happened about a week ago, but I haven't updated the blog ;-)

The engine build was relatively straight-forward, as it turned out.
Install cam shafts and verniers
Cam shafts open and close the valves on the top of the engine to allow air into the combustion chamber (through the inlet values), and another set allow exhaust gasses out of the engine (outlet valves). The profile of the cams determines how long the valves are open (duration), and how wide they open (lift). So basically, these two spinning shafts are a key component in the whole process, and need to be matched very, very carefully to the movement of the pistons in the cylinders. Get it slightly wrong, and the cylinders won't get enough air, or be able to push out all of the exhaust, leading to a reduction in power. Get it severely wrong and you can get a cylinder head hitting an open valve, which will break the valve and damage the cylinder head.

The cams are installed by first placing them into the guides, then measuring the gaps between the buckets and the cam. The bucket is a, well, bucket-like thing that sits over the springs. As the cam turns, the lobe hits the bottom of the bucket, pushing it and the spring downwards, and opening the valve. There needs to be a small gap to ensure the valve is completely closed when the cam is off, but not too much. Each bucket can be moved, as each bucket is very slightly different in height, which allows you to shim up the springs to the correct height.

Then the engine is placed into top dead centre, which is a known position of the engine cylinders. The cams are turned into their correct position by checking the position of the cam and the position of the engine. I won't go into massive detail here, except to say that as mentioned, the cams and cylinders have to be perfectly matched, so that the valves are opened and closed at the correct time.

Refit timing chain and chain guides, and front engine plate
With everything timed up, the crank (which is driven by the cylinders) and the cams verniers (which turn the cams), must be linked via the timing chain. In most cars, this is a toothed rubber belt, but the Duratec has a chain which is generally more reliable, but needs to be oiled. Hence is it a sealed part of the engine, whereas other cars have their belts external.


Install flywheel and clutch
The next step is to install the flywheel. The flywheel is a heavy metal wheel attached to the engine. The flywheel takes a lot of energy to spin up, which in turn provides a store of energy back to the engine. It's the flywheel that keeps the engine revs from plummeting when you take your foot off the accelerator, and also helps the car climb steep hills. The flywheel is also toothed around the edge - this allows the starter motor to engage with the flywheel to turn the engine when you turn the key.


I've opted for a lightweight (relatively speaking) flywheel, as having a lighter flywheel improves acceleration, as there's less rotational mass to spin up. The flywheel is bolted directly to the camshft using some new ARP bolts. Great care was taken, as the manual states they should be done to 175nm, which is actually waaaay too high. Others were stretching their bolts terribly, and were lucky to not snap them off. The manufactures guide, and ARP themselves, stated 100nm which is more realistic.

Once the flywheel is on, the clutch goes on. The clutch comes in two parts - the housing and the clutch plate. The plate is attached to the rear drive train, and is the link between the engine and the rear wheels .With your foot off the clutch, the clutch plate is pressed hard up against the flywheel, and the turning engine turns the wheels. With your foot on the clutch, the clutch slave cylinder pushes outwards, which pressed on the clutch housing. The housing then releases the pressure on the clutch plate, which then lets go of the flywheel. As it's a hydraulic system, the clutch plate progressively engages and disengages with the flywheel.

An important point to note is that the clutch slave cylinder and the clutch housing must be a set distance when the two are brought together. Note that the slave cylinder is installed in the bellhousing, and the clutch on the engine. So you need to measure the distance between the front of the clutch and the front of the engine, and the distance from the front of the bellhousing and the clutch slave cylinder. You can then work out how much travel the clutch cylinder will have, then install a spacer to get it into the right position.

Bolt bellhousing and gearbox to engine
With the clutch and slave cylinder correctly spaced, it's a simple job to bolt the engine and gearbox together. It's all a bit heavy, and a two man job, but get it all lined up and the spline of the gearbox goes straight into the centre of the clutch plate. Whack in a few bolts, and it's all done.


Lift car and drop over engine
Installing an engine into most cars involves lifting the engine and dropping it into the car. Installing and engine into a Birkin involves lifting the car, and dropping it over the engine. The car at this stage is probably lighter than the whole engine / clutch / gearbox combo anyway, plus it can get a little tight in the engine bay, so this way is a lot easier.

Just pick up the front of the car, and push the engine underneath. With some wiggling and shifting, the whole thing slides in no problem.


It was at this point that we discovered a small glitch. The Birkin has a cross member linking the two sides of the car underneath the bellhousing. It's a fairly important crossmember, as it provides a lot of torsional stiffness to the chassis. However, with the 2.0L engine installed, the bellhousing is lower than the bar, which means it doesn't fit. So there's a small job to re-engineer the bar to fit the bellhousing.

We also noticed that the engine sits quite low in the engine bay - this is probably because the engine mounts are set for the 2,3L engine, which is taller. All this means is that the 2.0L sits quite low in the engine bay.
Install prop-shaft
The final step in this post is to install the prop-shaft. This links the gearbox to the differential. It also isolates the fixed rear axle from any movement generated in the engine (and vice versa). It does this with two universal joints to isolate up and down movement, plus it slides along the spline from the gearbox for any back and forwards movement.

It's also worth noting that this is a critical failure point in the car - if the propshaft lets go, you then have a very heavy, steel shaft thrashing around mere centimeters from the driver at very high rotational speeds. Hence the two steel hoops there to protect the driver and passenger.

It's also interesting to note that the entire power from the engine is, at so many places, transmitted via a few bolts - 6 for the flywheel, 4 a the propshaft, and about 12 at the half-shafts. I always imagined far more engineering and strength went into this, but apparently it's all as it should be.
And that's it, the engine is installed and linked to the rear wheels. As soon as I mention the fact that the engine was installed, everyone keeps asking me "so what's it like to drive". Then I talk about engine looms, exhaust systems, induction systems, ignitors, barometric pressure sensors, fuel lines, throttle cables and so on, and they don't ask any more....

Sunday, April 6, 2008

Engine is back!

The engine has been rebuilt ;-) The cams are in and timed, the front cover is back on, the harmonic is on, the water rail installed, and various other bits bolted on ;-) I now need to create a few blanking plates to block off part of the air system (EGR), and get a few fittings to block off some of the water system (heater). Then we can drop it onto the floor and fit the bell housing and gearbox.

Thanks to Mike for his efforts on this.....

This basically means that I have about two weeks effort to complete the build, I reckon. It should all move pretty quickly from here. Having said that, there's probably a thousand and one things I don't know about that will get in the way ;-)

Remounting the Seats

With the racing seat in place, it became apparent that my head will be above the rollbar when I have my helmet on. Kinda defeats the purpose of having a rollbar in the first place, really, as in the event of a rollover my head will be ensuring the rollbar comes out unscathed. So yet again I'm copying an idea from Frank, and repositioning the seat to be a lot lower.

The standard car comes with a set of movable rails mounted to a steel frame - all up there's probably 4kg of steel in the driver and passenger seat mountings. In addition, they put the seat about 2 cm from the floor, and with the thickness of the seat, that puts you about 8 cm up. With the modifications, you can get this down to about 3cm. 5cm doesn't sound like a great deal, but it makes a huge difference to the feeling of being "one with the car".

The modification basically involves removing the subframe (held in by four bolts), and angle grinding the two rear mounting points. The two rear points have a lip on them which prevents the seat from sitting on the floor.

Next, fashion a base plate out of 3mm aluminium. 3mm ali is probably overkill, and overweight, however seeing as your butt is now that much closer to the ground, a little armour plating probably doesn't go astray ;-) Plus, it adds some stability to the seat, as the seat is mounted directly to the plate itself.

The next step is to position the plate. The plate needs to fit in between the rear mounting plates for the seat belts and the floor. This means that the base plate is held in place by the same bolts as the seat belts, which are strong 10mm bolts. In addition, the plate is bolted to the steel crossmember in the footwell.

With a few rivnuts in place, the seat now bolts to a strong base which drops the driver (and passenger now I've done the same to the other side) lower into the car.

The downside is that the driver seat is now basically fixed in place. However, we also fitted the standard driver seat to the base, and it turns out that Dad fits in quite nicely! So he'll still be able to drive it (if I let him ;-)