OK, so it's in the workshop, and now it's time to prep it for painting. Which basically means deconstructing it further, and feeling like I'm going backwards instead of forwards.
Having said that, it's also a good time to start improving some of the elements on the car. The standard fuel filler cap, for instance, is a complete travesty and should only be considered a stop-gap measure until something better can be fitted. So once the fuel tank came out, I drilled the four rivets and a new fuel filler cap is on order from Meridian. They do a nice flush-mounted alloy filler cap that will sit far better with the overall look of the car.
Mind you, as I was drilling these out Frank glides past and screams "be careful, you're drilling into the car" or some such thing, which is precisely what I was thinking. I might need to become a little less tentative.
Other activities included removing the standard bonnet clips, as they were dodgy and a bit tacky. These will be replaced with the rubber style clips that are slightly larger, but are less obvious and feel like they might actually hold onto the bonnet.
Other tasks included rasping out holes for the windscreen wipers, removing various bits of rubber, and taking the rear splitters off.
The other thing that became apparent was that I need to think longer and harder about the paint scheme. It's all very well and good to say "I want green", but what about the rest? The rollbar, the front suspension, the windscreen surround, the splitters etc. If I chrome stuff, do I go shiny or more like polished aluminium? Do I want the engine bay painted complementary colours etc etc? So more thought required.
But, it's moving forward. Next week should see the last jobs done before it gets sent to the painters, then there'll be a hiatus for a few weeks, during which time the parts from the UK should have arrived, so at least I'll have some new toys to play with.
The Birkin
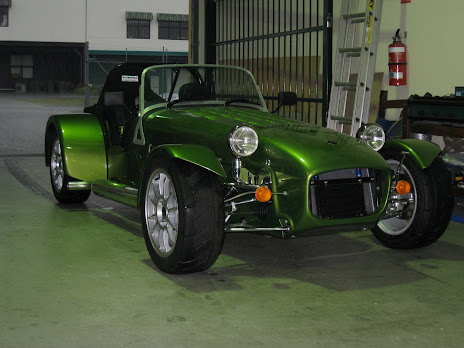
The finished article
Monday, February 26, 2007


Monday, February 19, 2007
....and once more back to Perth
Well, nothing was happening on the car, plus I was getting a little concerned that there was little that I could really achieve until the car was painted. I mean, I was bolting in all sorts of things, but not torquing them up because it all had to come out again once it was ready to paint, so why not paint and then build it once? Could take a long time otherwise....
 Anyway, it's now back in Frank's workshop - this weekend I'll be in drilling and prepping, then it will be off to the painters. The intention at this stage is still to paint it Hothouse Green, but I'm wondering what that would look like with copper threaded through it. Might be more trouble than it's worth, but I'll have a chat to the paint guy and work something out.
So the car came back to Perth yesterday, bolted onto the painting frame and on a trailer. It was an extremely odd drive, with the nosecone about a foot from the rear window and just over the roofline of my brother-in-laws car. Also got a few looks from people passing by.....
 Anyway, it's now back in Frank's workshop - this weekend I'll be in drilling and prepping, then it will be off to the painters. The intention at this stage is still to paint it Hothouse Green, but I'm wondering what that would look like with copper threaded through it. Might be more trouble than it's worth, but I'll have a chat to the paint guy and work something out.
Once that's done, I'll be able to put things into the car for real and stop pretending ;-)
Monday, January 29, 2007
Fastlane Driving School
A lot of what people tell me about going fast is that it doesn’t matter how many ponies are under the bonnet, it’s about the skill of the driver. Having watched that Top Gear episode where Sabine Schmitz drives a diesel transit van around the Nurburgring, I can well believe it.
Plus, my Dad seems to like driving fast, so why not combine the two, I thought. So I bought Dad a day driving Formula Fords at Waneroo Raceway for Christmas, and thought I’d treat myself as well.
The whole day was pretty slickly run – first, you get divided into groups based on height and build, so that they can put you in a car with something close to what you need. After a bit of heel-and-toe practice in the car, you get taken out in an SS Commodore for a run of the track.
The organisers had helpfully put out little signs indicating where to brake and change gear for each corner. At this stage, the only observation I could make was that the braking zones appeared to start rather close to the corners themselves…..
Anyway, after that it was back to actually drive the cars. The Formula Fords we were driving were powered by 110bhp Ford Crossflow engines – relatively common a few years ago in Clubmans, but now superceded by newer engine designs. However, given the weight of 420 kg, this is enough to propel them to 100kph in under 5 seconds. Strangely, given that I’m after a 220bhp car that weighs around 600kg (but with a higher drag) the performance in a straight line should be similar to the Birkin. They'll probably go around corners faster.....
So, first out is 10 laps behind a pace car – fairly tame, but useful for working out the racing lines and practicing the gear changes.
The next 10 laps are on your own, where you are supposed to gradually feel your way into the performance of the car. Bugger that. I prefer to rush into these things and find out where the overlap between driver confidence and ability ends, so of course I spun out on the first lap. However, it did give me a feel for what the car does when it lets go, which will prove useful later on.
After lunch, another 10 laps were spent doing timed circuits, and this is where Fastlane differentiate themselves from other trackdays I’ve been on. You get some pretty decent feedback from guys who actually race these things professionally, so they can tell you what you’re doing wrong at which points. As long as you listen, you can make some pretty serious inroads. I’d started out in the mid-60’s early on in the time sessions, but was down to 59 seconds a lap by the end.
After that, it was the serious business of the timed race. Obviously, they don’t let you rub bumpers with each other (only two overtaking zones allowed, both on long straights), so the timed sessions were used to space us out to avoid traffic. However, after some final advice, they basically let you out to go as fast as (safely) possible. Spinning out, however, meant disqualification, as the idea was to get the lowest average time over 10 laps.
And the result – need you ask? I was damn pleased to see an average time of 58.6 seconds, and a fastest lap of 57, which is only a few (but extremely hard to find) seconds off something competitive. Got a little trophy and everything. Dad’s laptimes were rapidly improving by the end, and with a few more laps would have been pretty competitive.
Overall, I reckon the Fastlane operation was the best trackday I’ve done by far. Most other times they just bolt you in and give you all sorts of dire warnings about crashing, then let you loose. Fastlane treat this as a school, so you’re there to learn and improve rather than just go as fast as possible. I actually learnt something about driving, the capabilities of the cars and my own driving style that day, which will stand me in good stead with my own car. I'd recommend them to anyone in the Perth area looking to improve their own track driving, esp with a Clubman.
Plus, my Dad seems to like driving fast, so why not combine the two, I thought. So I bought Dad a day driving Formula Fords at Waneroo Raceway for Christmas, and thought I’d treat myself as well.
The whole day was pretty slickly run – first, you get divided into groups based on height and build, so that they can put you in a car with something close to what you need. After a bit of heel-and-toe practice in the car, you get taken out in an SS Commodore for a run of the track.
The organisers had helpfully put out little signs indicating where to brake and change gear for each corner. At this stage, the only observation I could make was that the braking zones appeared to start rather close to the corners themselves…..
Anyway, after that it was back to actually drive the cars. The Formula Fords we were driving were powered by 110bhp Ford Crossflow engines – relatively common a few years ago in Clubmans, but now superceded by newer engine designs. However, given the weight of 420 kg, this is enough to propel them to 100kph in under 5 seconds. Strangely, given that I’m after a 220bhp car that weighs around 600kg (but with a higher drag) the performance in a straight line should be similar to the Birkin. They'll probably go around corners faster.....
So, first out is 10 laps behind a pace car – fairly tame, but useful for working out the racing lines and practicing the gear changes.
The next 10 laps are on your own, where you are supposed to gradually feel your way into the performance of the car. Bugger that. I prefer to rush into these things and find out where the overlap between driver confidence and ability ends, so of course I spun out on the first lap. However, it did give me a feel for what the car does when it lets go, which will prove useful later on.
After lunch, another 10 laps were spent doing timed circuits, and this is where Fastlane differentiate themselves from other trackdays I’ve been on. You get some pretty decent feedback from guys who actually race these things professionally, so they can tell you what you’re doing wrong at which points. As long as you listen, you can make some pretty serious inroads. I’d started out in the mid-60’s early on in the time sessions, but was down to 59 seconds a lap by the end.
After that, it was the serious business of the timed race. Obviously, they don’t let you rub bumpers with each other (only two overtaking zones allowed, both on long straights), so the timed sessions were used to space us out to avoid traffic. However, after some final advice, they basically let you out to go as fast as (safely) possible. Spinning out, however, meant disqualification, as the idea was to get the lowest average time over 10 laps.
And the result – need you ask? I was damn pleased to see an average time of 58.6 seconds, and a fastest lap of 57, which is only a few (but extremely hard to find) seconds off something competitive. Got a little trophy and everything. Dad’s laptimes were rapidly improving by the end, and with a few more laps would have been pretty competitive.
Overall, I reckon the Fastlane operation was the best trackday I’ve done by far. Most other times they just bolt you in and give you all sorts of dire warnings about crashing, then let you loose. Fastlane treat this as a school, so you’re there to learn and improve rather than just go as fast as possible. I actually learnt something about driving, the capabilities of the cars and my own driving style that day, which will stand me in good stead with my own car. I'd recommend them to anyone in the Perth area looking to improve their own track driving, esp with a Clubman.
Monday, January 15, 2007
Day 1 - Taking it apart and putting stuff on
OK, so the build has started - by taking things off. My six year old nephew was a little non-plussed that by mid-afternoon it still wasn't finished. He seemed to take comfort in the fact that it would have been, but I'm missing a few pieces. In order to keep the peace I think those pieces will remain missing for some months.....
So, the nose is off, as is the scuttle. Nothing tricky there. However, in order to feel like I've actually achieved something, I though taking the first steps of installing the steering rack and front wishbones would at least show some progress.
The chassis arrived with most of the steering already installed, although I will be giving everything a good torquing to later on when I get a torque wrench. So it was just a matter of removing some more stuff and bolting the one extra part in.
 And it's now that I understand why these things take a year. Dad and I must have put that thing in six times, each time realising that this bit should actually go over that bit, or that to put this in, week needed to have done this and that in step 1. All I can say is thank goodness for digital cameras.
Anyway, the steering rack eventually went in, although it's not a terribly good fit, and I'm assuming that the aluminium blocks holding the rack will crush in around it to hold it secure.
The upper and lower wishbones were also a simple plug and play operation, albeit with a few exertions to get the ends into the brackets. It's a tight fit in there ;-) I'm just waiting on the front sway bar and shocks / springs to arrive before these are fitted, along with the uprights. Then I can put the wheels on a see what they look like.....but now, looking at my hectic social calendar, plus time commitments from my MBA, it will be a few weeks before I get back to the build.
However, there's still the engine to talk about, plus a few car related events to occur between now and then, so my faithful 150 readers, stay tuned ;-)
So, the nose is off, as is the scuttle. Nothing tricky there. However, in order to feel like I've actually achieved something, I though taking the first steps of installing the steering rack and front wishbones would at least show some progress.
The chassis arrived with most of the steering already installed, although I will be giving everything a good torquing to later on when I get a torque wrench. So it was just a matter of removing some more stuff and bolting the one extra part in.
 And it's now that I understand why these things take a year. Dad and I must have put that thing in six times, each time realising that this bit should actually go over that bit, or that to put this in, week needed to have done this and that in step 1. All I can say is thank goodness for digital cameras.
It's probably also worth describing my build sequence at this point as well. The idea is that the build will go in, say, four stages:
- Stage 1 - prebuild. Dad and I will fit everything possible to the car, making sure we have all the bits etc, but will not tighten anything to it's final levels at this stage. We'll drill the holes for the tonneau, windscreen washers and bottle, seat rails etc, fit the rollover bar, suspension etc. The idea is to get a rolling chassis. This will also give us something concrete to start planning colour schemes etc.
- Stage 2 - paint. The car will head back to Perth, get put on the paint stand, and have most of the various bits removed before painting.
- Stage 3 - rebuild. The car, once painted, will be rebuilt from the start and everything torqued up, nylocs etc replaced where required etc. After Stage 1, this should be a meccano set build.
- Stage 4 - drivetrain, wiring etc. The final bits and pieces.
Anyway, the steering rack eventually went in, although it's not a terribly good fit, and I'm assuming that the aluminium blocks holding the rack will crush in around it to hold it secure.
The upper and lower wishbones were also a simple plug and play operation, albeit with a few exertions to get the ends into the brackets. It's a tight fit in there ;-) I'm just waiting on the front sway bar and shocks / springs to arrive before these are fitted, along with the uprights. Then I can put the wheels on a see what they look like.....but now, looking at my hectic social calendar, plus time commitments from my MBA, it will be a few weeks before I get back to the build.
However, there's still the engine to talk about, plus a few car related events to occur between now and then, so my faithful 150 readers, stay tuned ;-)
It's here, it's here!!!
Yup, finally picked it up. Well, most of it. A box or two was missed in the shipment from Melbourne (understandable - they were broken into again.....), so there're a few more exciting bits of car still to arrive. However, enough arrived to make it look like something's happening!
Went around to Franks to pick it all up, and found it was all nicely boxed up and ready to go. All I had to do was put all the loose bits (like brake disks, exhaust headers, metal thingamies that will go somewhere I'm sure, etc) in the back of the 4x4 and we were good to go.
 I must admit I'd never towed anything this large before, so was a little hesitant. Got slightly spooked driving along hearing an odd rumbling noise, then noticed that the trailer was running over the catseyes. Everyone was giving me a respectable margin on the road ;-)
However, once on the freeways and highways, all was fine, and I eventually got used to the width of the wheels. Getting it to my parents place was another matter - Dad's advice was to "keep your speed up and you'll be fine". My parents driveway is 2km long, gravel, and goes through two steep valleys. People in rear wheel drive cars need to be rescued. And here I am in a heavy 4x4 towing a large trailer. Luckily all went well - dusty, but well.
 So now it's in the shed, having gotten the thing off the trailer and onto the stand. Only one slight off note - when the packing guys put the frame over the chassis, they must have run the frame down the side of the car, as there's a decent sized scratch and slight crease in the passsenger side. Shouldn't be a problem though, as I'm planning on painting the sides, and the crease should be easy to remove.
Friday, January 12, 2007
Tools and such
One of the things to consider when building a clubman is the tools you will require. One of the main attractions to me of the Birkin was that it didn't strictly require any fabrication to finish it, keeping the number and complexity of tools down. The basic idea is that you should be able to finish the job using the tools common to everyday use - screwdrivers, rubber mallet, socket set etc.
The build manuals that come with the Birkin have, at the start of each section, a listing of the components and tools required to complete each one. That's fine, but being the sort of person I am, I preferred to know what tools I'd need up front, so I pulled all of this information out into a spreadsheet, sorted it, removed all the duplicates, and came up with a list of stuff. Basically, you need the following:
The build manuals that come with the Birkin have, at the start of each section, a listing of the components and tools required to complete each one. That's fine, but being the sort of person I am, I preferred to know what tools I'd need up front, so I pulled all of this information out into a spreadsheet, sorted it, removed all the duplicates, and came up with a list of stuff. Basically, you need the following:
- metric socket set
- allen keys
- drill bits (for drilling metal, but really only soft aluminium), and of course a drill
- rivet gun (for the press-studs on for the tonneau and roof)
- torque wrench (ranging from 5 - 150Nm)
- screwdrivers
- silicone, grease, locktite, masking tape, drop sheets, pencil.....
So nothing there that looks too atypical, apart form the torque wrenches and I'm going to borrow those off Frank anyway. There are, however, a few tools to make life easier that've been made up. These aren't strictly necessary, however they can make life simpler.
So it's back to The Hanger to find out what we have and what we're missing. I may buy some things like the spanners and sockets, screwdrivers etc just because I need them anyway. I have, for example, a new bed that needs a screwdriver or two to put together.
Thursday, January 11, 2007
To Max Power or to Not Max Power....
A little wrinkle has appeared around the engine package - I was aiming at the 220bhp, as there seemed only a minor difference in price. However, where Raceline mention the GBP120 for the pocketed pistons, what stupid me didn't understand was that to pocket said pistons, you must first strip the engine down. And whilst you're there you may as well strengthen some other internals, "key the crank" (what-ever that means ;-), port and polish the head, and so on.
So the extra 10bhp ends up costing another $2000 - law of diminishing returns kicks in. I prefer to think of it in terms of $ per bhp over the entire engine, which means an increase of a mere $6.35 per bhp. Surely that's a bargain!
I guess at the end of the day it all comes down to power to wallet weight ratio. I mean, you can go the whole hog and go for a 250bhp 2.0L engine for around $20K, or go 2.3L and get 300bhp for I don't know what price.
So Frank and I have tossed it backwards and forwards. And what was the decision?
Are you kidding. Max Power...... 220bhp it is. Should knock that ever important 0.1 seconds off the 0-100kph time....
So the extra 10bhp ends up costing another $2000 - law of diminishing returns kicks in. I prefer to think of it in terms of $ per bhp over the entire engine, which means an increase of a mere $6.35 per bhp. Surely that's a bargain!
I guess at the end of the day it all comes down to power to wallet weight ratio. I mean, you can go the whole hog and go for a 250bhp 2.0L engine for around $20K, or go 2.3L and get 300bhp for I don't know what price.
So Frank and I have tossed it backwards and forwards. And what was the decision?
Are you kidding. Max Power...... 220bhp it is. Should knock that ever important 0.1 seconds off the 0-100kph time....
Subscribe to:
Posts (Atom)