The Birkin

The Birkin
The finished article

Sunday, March 2, 2008

Putting it all back together

With the engine parts now back, the engine can start to come together. On the principle that I'm barely qualified to tighten a bolt, I've decided to allow someone else to assemble the explosive part of the car ;-)

So, Mike has come back to reverse the exercise of disassembly, and is putting it all back together. So far, the crank is back in, along with the pistons. At this stage it's all large things going back in, so progress is fast, however next weekend we're looking at the cams, belts and chains etc, which could take a little longer.

Some early photos:


I have an engine!

Yes, the big news over the weekend is that the engine is back from the workshop, with the head ported and polished, the crank keyed, and the pistons flycut.....

So, what does that all mean? Well, porting the head means cutting away additional material from the part where the air gets into and out of the engine - again, one of the most important things for an engine to develop peak power is it's ability to breath, so removing any barriers or inefficiencies (such as rough patches, edges etc) will always yield results. The thing with the Duratec head is that it's pretty perfect as it stands. So, unlike the Zetec which was also cut for another Birkin (where a huge amount of material was removed), the Duratec is more of a polish. The key element is that the ports allow the right volume of air to flow based on the size of the valves, so there's no restriction in the head. Also, the split between the two chambers has been cut to a knife edge to reduce turbulence.

Keying the crank has been discussed before, and as you can see in the photo, it's a simple matter of notching the gear and putting a small key in the crank itself. Now, the gear cannot move on the shaft. Given the revs and power I have, I've read that it's probably overkill, but what the hell....


The pistons were apparently the hardest part. As you can see in the photo's, not a great deal of material was removed, which is what you're aiming for, as wholesale shredding of the piston heads is to be avoided. So you can see that there are now four small scallops taken out of each piston, which will allow the clearance required by the new, more aggresive cams.

All in all some nice work that will allow the engine to reach it's peak performance once it's all back together.

Thursday, February 28, 2008

Racing Seats

One of the tasks I had put aside for a rainy day, but thought I may as well do now as I have the time, is to install the racing seat.

Basically, the reasoning behind a racing seat is that it holds the driver in place better than the standard seat. In normal road use, this isn't a problem, however under the stresses of track use, a better seat is required.

I've bought a 15 inch Road / Race seat from Go Gear (www.gogear.com.au). The seat itself is an aluminium seat with a foam cover - pretty basic, but it fits into the Birkin with some modifications. So, I go out and spend over $600 on a seat, and then attack it with a sledgehammer.

To get the seat to fit, you need to bend the right hand shoulder wing in, as it doesn't clear the side of the car. Then you do the other side so it doesn't look to lopsided. Then you sit in it and work out that you don't fit anymore....so you hit it a few more times.

I also ground off the welds underneath the seat, removed a few studs, and bash in the side support around the base to give more clearance for the base. And it all fits in fine! I've also removed the sliders under the seat, and mounted the new seat to rivnuts put into the seating frame itself.

The seat means that I'm now really, really, held into the car, plus I'm a lot lower. I've also had to move the pedal box once more, as I'm also a lot further back in the car than before.

I'm also still waiting for the engine parts to come back, but again I'm expecting them this weekend.

Saturday, February 9, 2008

And now the front end

With the back end mostly done, attention switches to the front end. Basically the nosecone can now get fitted up, and the front indicators installed.

The first thing is putting the Birkin badge on the nose - pretty simple, but the black and silver looks really good against the green, and matches the rest of the car.

Getting the front indicators on is another matter. The indicators have to be within a certain distance from the outer edge of the car, which for the Birkin is the front wheel. To get these on, you have to drill two 10mm holes in the fibreglass nose - however the fibreglass is pretty brittle, and tends to shatter and flake, taking the paint with it. I drilled a few pilot holes, and luckily the damage to the paint isn't too bad (it's covered by the washer). But there's another thing I should have done before painting....

I also had a shot at putting the bonnett clips back on using stainless rivets, however got the size completely wrong and had to drill them all out. This worked well apart from the last two, so I've managed to gouge the aluminium skin a little. It'll be covered by the latch when it goes on again, but it looked pretty dodgy for a while there.

Anyway, more photos to be added.

And an update on the engine - delivery of all the parts promised for the end of next week ;-)

Tuesday, January 29, 2008

Back end of the car

OK, some more details on the work done behind the driver.

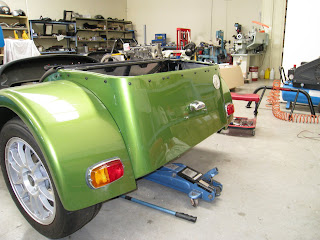
It's pretty much all done now, with the fuel tank in, filler cap on, lights installed, fuel lines installed etc. It looks like this now:

The fuel lines are all EFI standard, as the fuel will be under some pretty high pressure through the system. I reckon I'll need about 4m of the stuff all up, and at $15 per metre it's another little expense to add to the spreadsheet ;-) I also installed a fuel filter from a BMW K-series motorcycle. Although when I went to buy it they tried to ask all sorts of questions about the bike, and they got a little concerned when I said it was going into a car...

I still need to get the charcoal canister - this takes the fuel vapour from the top of the tank and runs it through some carcoal to filter out most of the environmentally unacceptable bits before venting to the atmosphere. So there's one more line to run from the small silver thing on the right hand side to another canister which will go on the left.

What else - fuel filler cap is in, with the judicious use of the heat gun to get the pipe connecting the filler to the tank to bend. Bad bit of design, that.

I've also installed the rear lights - the number plate light, the two indicators / brake lights, and the reversing light (not shown). Took me ages to get them lined up, drilled all the holes, and I think the light on the right still isn't straight. Oh well, that can be fixed later. But it all definitely makes the back end of the car look, well, finished. I just have to put the rubber strips in between the rear guards and the body, and put the rear splitters on, and it's done. Oh, and move the reversing light so it doesn't stick out quite so far.

Engine news...

When too much power just isn't enough.....Frank has come up with a new option for the throttle bodies. There's a local (i.e. Melbourne) guy who casts his own throttle bodies, and is developing a straight through tapered throttle body for the Duratec.

So, now for a discussion on what this all means....

The throttle bodies replace the car's existing air intake (induction) system. Normal cars have a huge air filter with a single pipe feeding all of the cylinders at once. Throttle bodies provide independent air feeds for each cylinder, and incorporate a butterfly valve in each to control the amount of air that reaches each cylinder. Throttle bodies provide a cleaner airflow, and ensure that each cylinder receives the same amount of air.

Tapered throttle bodies start out wide, and end up narrow - as you can imagine, this means that the air arrives in the cylinder at a higher velocity / density - which is what turbo and superchargers are there for, to provide denser air. Now this is nowhere near a forced induction system, but it has the same effect of increasing power.

Most air intakes have kinks and bends in them, which introduces turbulence and disturbances to the airflow. The ideal is to have the air go straight into the cylinder head with the minimum of fuss, hence a straight-through throttle body is desirable. To be honest, the ones I have now are straight through as well....

The other thing about the new throttle bodies is that I can add another set of injectors later if I want to (would require a new computer) so that there would be eight injectors all up. Wrecks the fuel consumption but adds a heck of a lot of power, apparently ;-)

The only change to the outside of the car is that the hole for the throttle bodies will be higher up the bonnet, which as I haven't cut the hole yet, isn't a problem.

Apart from that, the engine is still in bits, so no other news there, I'm afraid.
Saturday, January 26, 2008

So much time, so little progress!

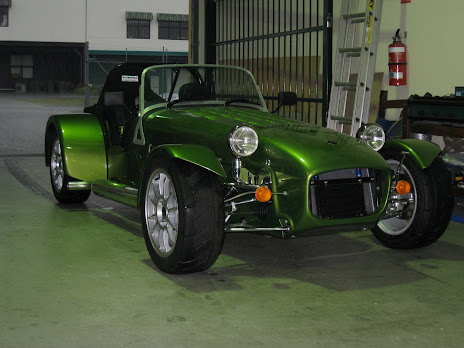
Well, OK, that's not entirely true. Quite a bit of progress has been made, actually, which given that building the car is now a full-time occupation, is only to be expected.....

Yup, I've taken a few months out to work on the car, sort out the house, get fit again, and do all the sorts of things that normally happen in between work, rather than what I've been doing which is just working.

So what have I achieved - I'll list them out:
  • All non-suspension related bolts torqued to final settings
  • Rear guards fitted, indicators / brake lights fitted
  • Number plate position and light installed
  • Fuel lines installed, along with fuel filter
  • Reversing light installed (although this will be moved later)
  • Centre console redone (didn't like the standard one)
  • Wiper blade arm installed
  • Headlights pre-fitted
  • Front guards fitted (still some work to do there)

The major changes are to the back end of the car, where all of the lighting is now installed, and it all looks pretty good. The real test comes when I can stand 50 feet away, where all of the angles will be more obvious - I have not doubt I'll be straightening a few bits and pieces here and there, but it will only be a matter of milimeters.

I've also ordered the plates - the car will be called "Mosquito", which somewhat changes the original theme I was going for. However, I think it's a good moniker - a mosquito is small, fast moving, agile, and has makes a noise you can't ignore. The Birkin will be small, fast moving, agile, and will make a noise you can't ignore from three suburbs away.

Anyway, I have some photos to add (at my parents once more on 128K), so will add these shortly, along with some more commentary on the work done to date.